Publishing a Website
Overview
A website isn’t really a website until it lives on the internet. Even if you’ve memorized every least letter of this book up until this point, if you don’t know how to publish your files, you’ll be the only one who can ever get to enjoy the sites you create.
This lesson aims to walk you through the steps of publishing a website from the initial stages of purchasing both a domain name (url or address) and a hosting account (server space for your files to live on), to acquiring and using FTP software for transferring your files to your new account, and finally, accessing your new website online.
Lesson Setup
This lesson won’t require that we build a whole new website since the focus will be on publishing a site rather than building one. For this lesson, we will borrow the site we created in lesson 17. If you haven’t yet completed lesson 17, or no longer have the site you created, that is okay. Any root folder containing a site you built will work fine. Make sure you have that folder handy, we’ll need it later in this lesson.
Hosting & Domain
In order to publish any website, we need two things: a domain name and a hosting account.
A domain name is the url or web address we use to direct our browser to our site. A domain name is composed of two major parts, the first part is the unique name and the second part is the domain extension. Common domain extensions are “.com”, “.net”, and “.org”. We often pronounce the period “dot” when we say web addresses. Domain names are like social security numbers, they are all unique and each website has it’s own.
A hosting account is essentially access to storage on a special computer called a server. Servers are dedicated machines that are designed to hold web files and listen for requests for those files. When the server recognizes a request for the files, the server responds by sending those files out to the browser so the person can see them. In other words, when somebody types in a web address, a server somewhere perks up and makes sure that site is delivered directly to that person.
Hosting accounts provide not only server space, but lots of other perks like backup servers in case of problems and certain security measures to protect your site from getting hacked. Nothing is full proof but each company has its own list of pros and cons, make sure that you choose one that has a good record of great customer support.
Purchasing Hosting & Domain
There are lots of companies out there that sell hosting accounts and domains. I’m sure you’ve already heard of a few of the more popular or more advertised ones. In this lesson, I’m going to cover one of them that I have used quite extensively and like for many reasons, the first is that they have really friendly, really fast, reliable customer support. They also have some very reasonable plans that fit all kinds of needs.
I’m going to walk you through the steps of purchasing a domain name and hosting account from a company called A Small Orange. The first step is to visit their site, asmallorange.com and take a look at what they have to offer.
- Navigate to asmallorange.com
- Click on Shared to see the plans they offer (fig. 1)
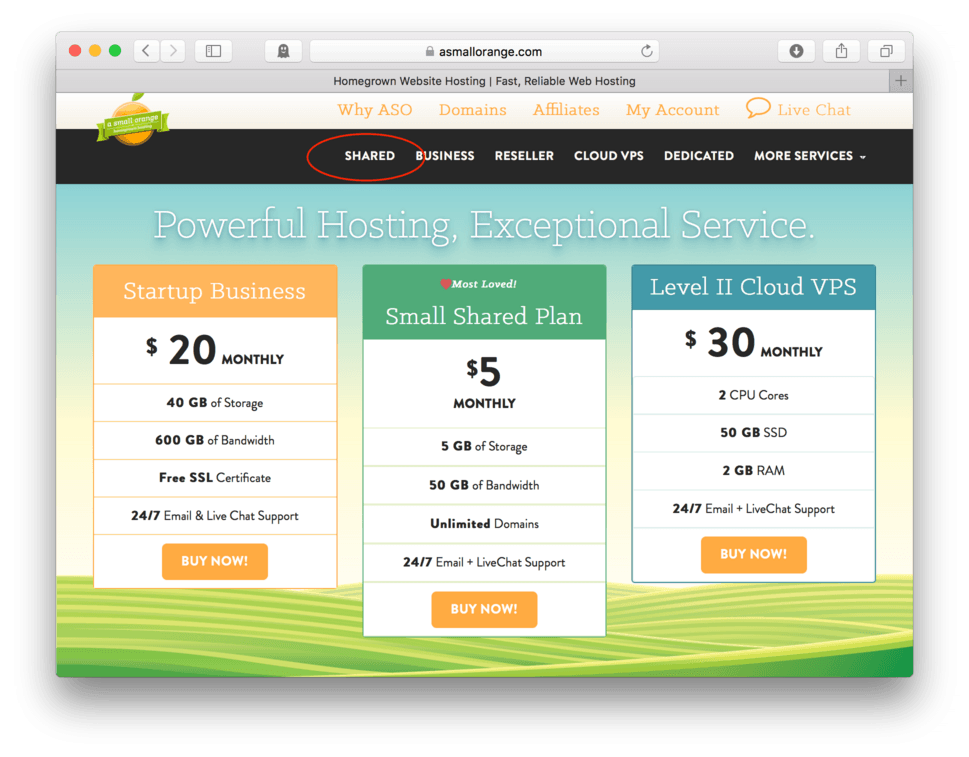
You’ll land on the page that explains all of their shared hosting plans. If you scroll, you’ll probably see four total plans, all with varying prices and features. (fig. 2)
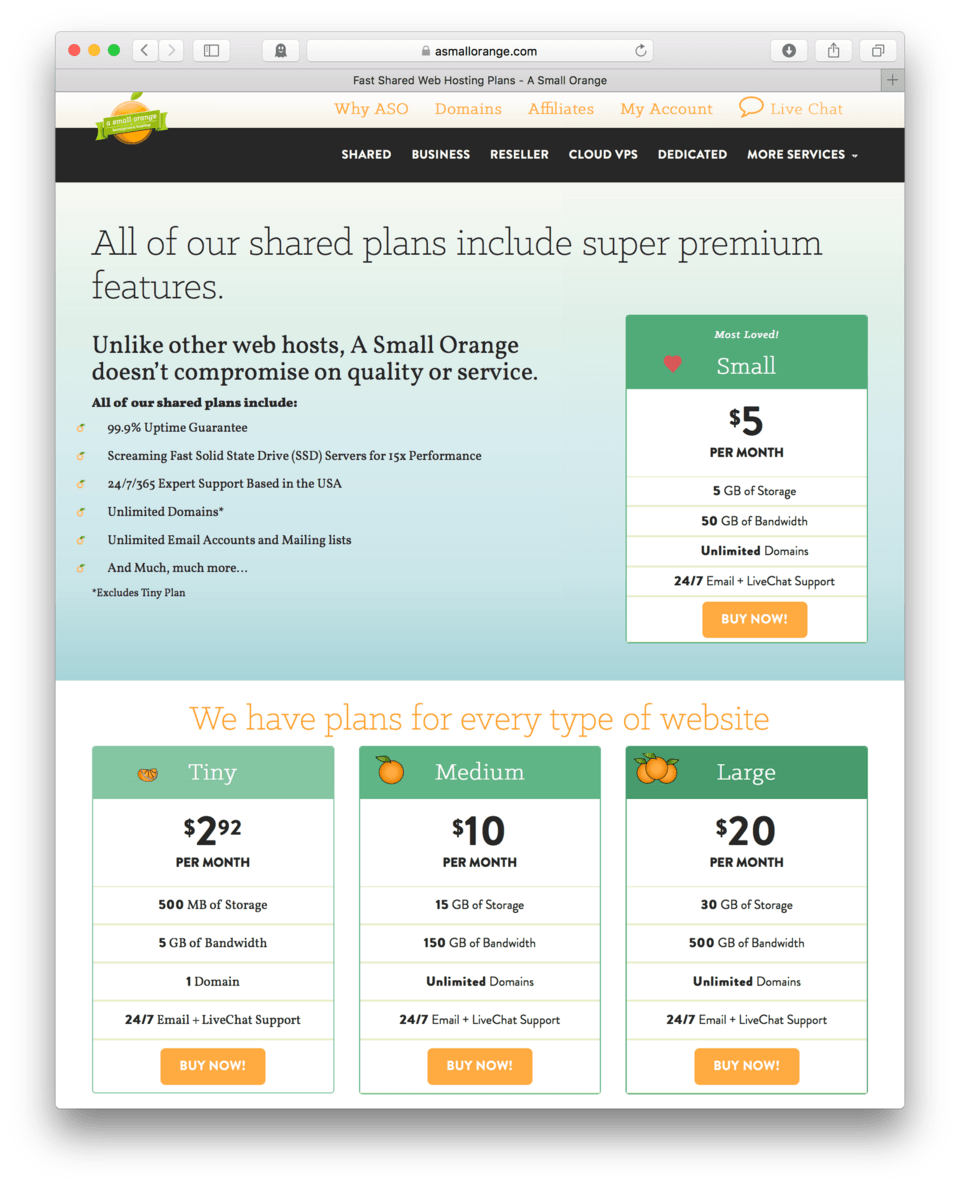
Unfortunately there isn’t a free or trial plan. Come to think of it, I don’t think I’ve ever really seen one but they might exist out there somewhere. Anyway, if you want to get your site live, chances are you’ll have to be willing to pay at least a little bit each month to a service, like this that can host the files.
You can see that the plans are pretty reasonable, the smallest plan, the tiny plan, (at the date of this writing) is less than 3 dollars a month. You’ll see that it includes 500 MB of storage, which is the space you’ll have for your files. That is plenty if you are running a personal website or small business site, especially if you don’t plan on hosting large files like video or audio files.
Other, larger plans offer much more storage if you have concerns about your file size. This is a good reminder why you don’t put anything in your root folder that isn’t on your site. An unnecessary photoshop file, for example, will just suck up storage and not add anything to your page.
The Tiny Plan also includes 5 GB of bandwidth, which roughly means the amount of traffic you’ll be able to handle. The more bandwidth you have, the faster the server will be able to deliver the content and the more people can access your site all at once. Bandwidth is one of the most limiting factors of a website and some people would argue that it is well worth the money to have additional bandwidth on your side. Even the next plan up offers 10x more for just another couple of bucks a month.
We see that with the Tiny Plan we can have 1 domain, or web address connected to this hosting account. This is fine if I don’t plan to use this account to host multiple web pages. That being said, if you want or need to publish multiple pages, it’s no problem to put them all on the same host provided that non of them get crazy amounts of traffic (I’m talking Amazon.com crazy) if that is they case, contact the company directly and talk to them about business hosting. All of the plans outside of Tiny, offer unlimited domains allowing you to have as many different sites as you want all in the same place.
Lastly, you’ll see that all the plans offer 24/7 email and Live Chat support, this is the really nice part. Even now, if I wanted I could choose Live Chat from the top navigation and ask a question if I’m having trouble or need help deciding. I’ve done it plenty of times, don’t be afraid to ask for help. They are all really nice!
I’m going to go ahead and recommend purchasing the Small Plan. If you are confident you won’t need the extra storage or bandwidth, you might be perfectly happy with the Tiny Plan and save yourself some cash.
Click on Buy Now on the plan of your choice. Don’t worry if you aren’t ready to buy today, it’ll be a while before they ask for your credit card. You can follow me for a few more steps.
The next page you’ll see is the order form (fig. 3).
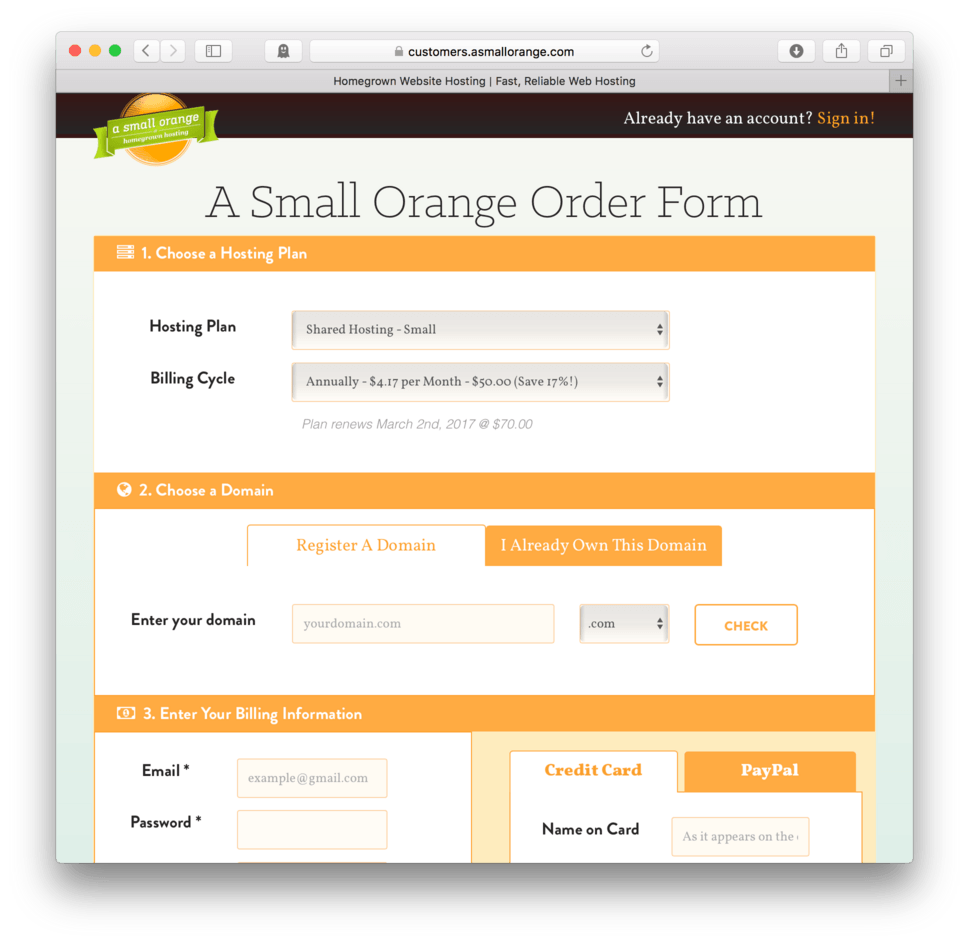
This guy is important because it allows you to check if your domain is available and allows you to buy it from here if it is. (fig. 4)
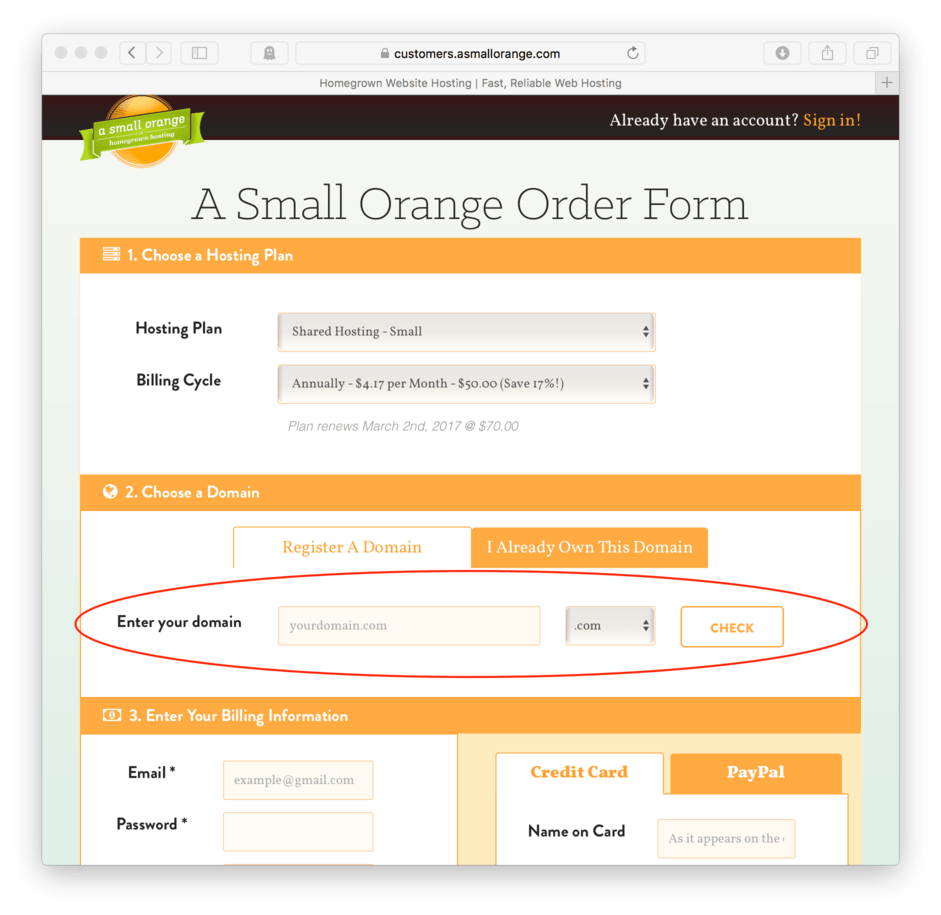
Go ahead and type in any web address (domain) you’d like to purchase. You might have to try a few, there are a lot of good ones already snapped up. Hit Check once you’ve typed in one you want to check. (fig. 5)

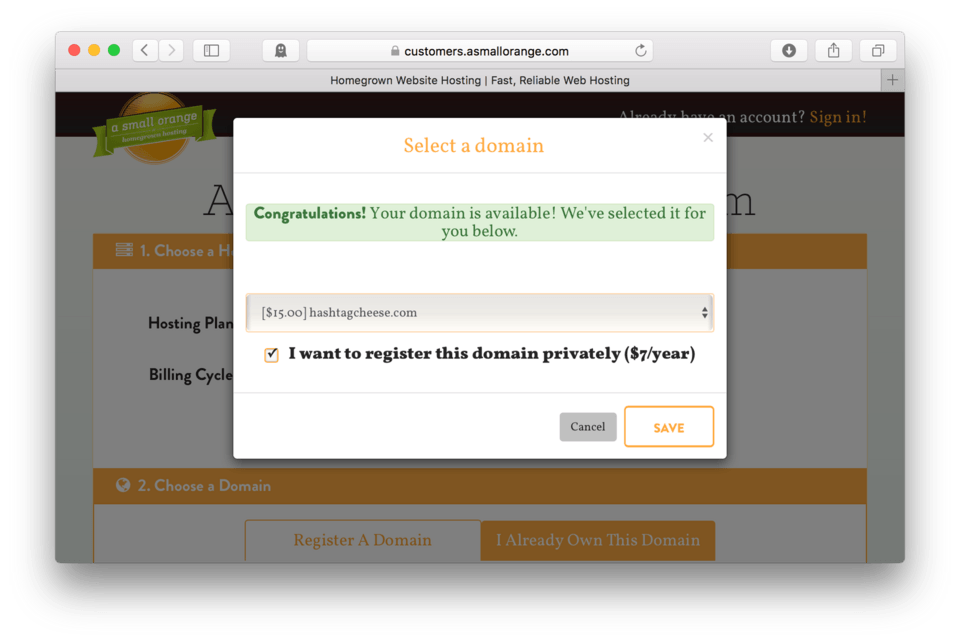
A window will pop up letting you know if your domain is available or if you’ll have to try again. (fig. 6). If it is available, you’ll be asked whether or not you want to register this domain privately. Essentially this is like the phone book, by default your contact information will be searchable by this domain name in the WHOIS Database. If you want to remain private, you’ll have to pay $7 a year for that. I typically leave the box unchecked, but it’s entirely up to you.
When you’re ready, hit Save.
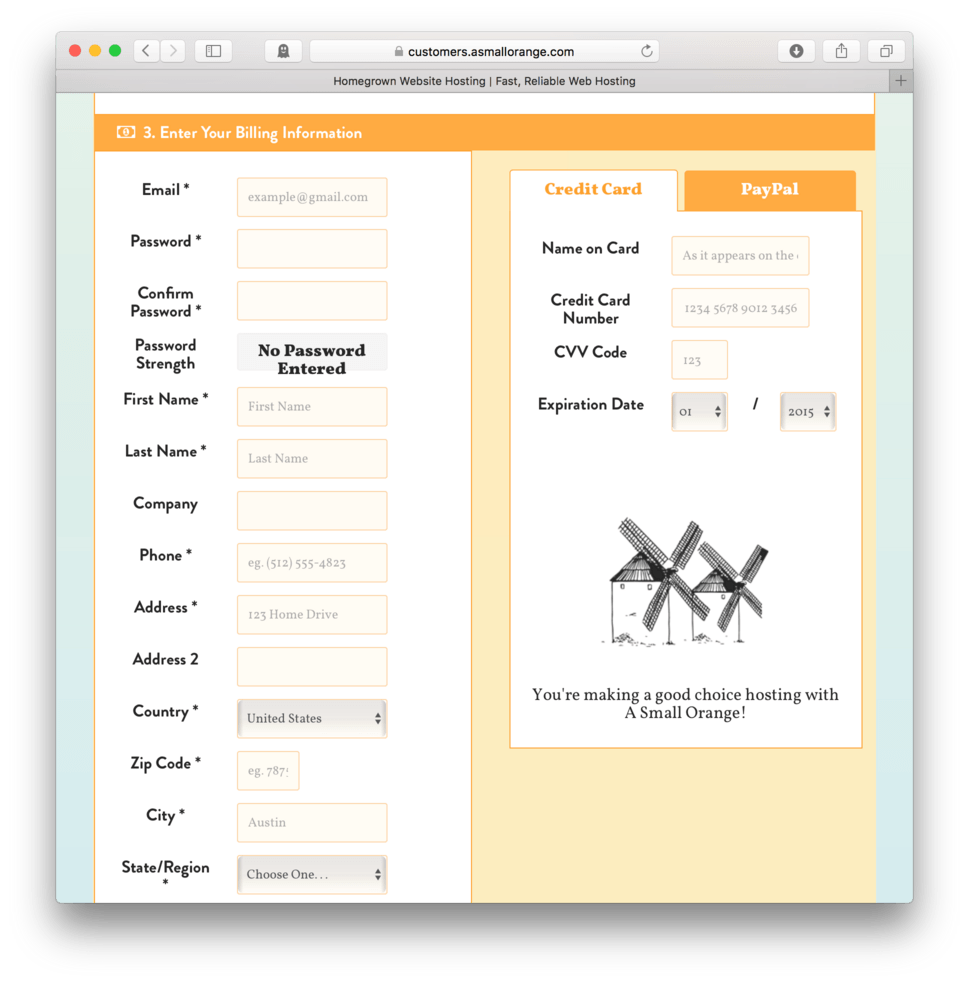
Now, like any other online purchasing experience, you’ll have to fill out your billing information and set up a security question. (fig. 7)
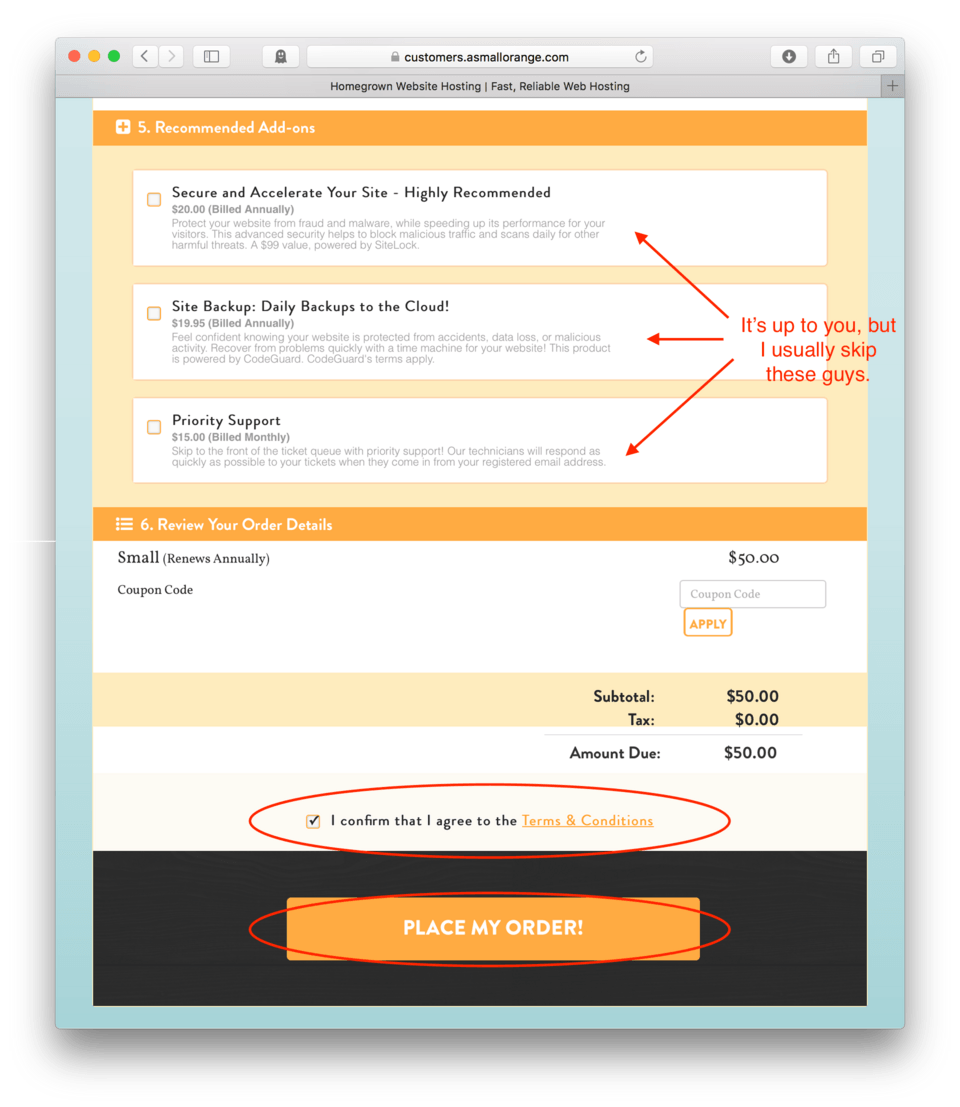
Next, you’ll see a list of recommended add-ons. These guys are some options you can do if you like. There are some advantages to extra security and daily backups, but they’ll add to your bill. I typically skip these for my sites and instead make regular backups on my own.
Lastly, make sure to click the checkbox agreeing to the Terms & Conditions and if you are ready, click Order Now to complete your purchase. (fig. 8)
Once you click Place Order, you’ll get a pop up screen letting you know that your order is processing. (fig. 9)
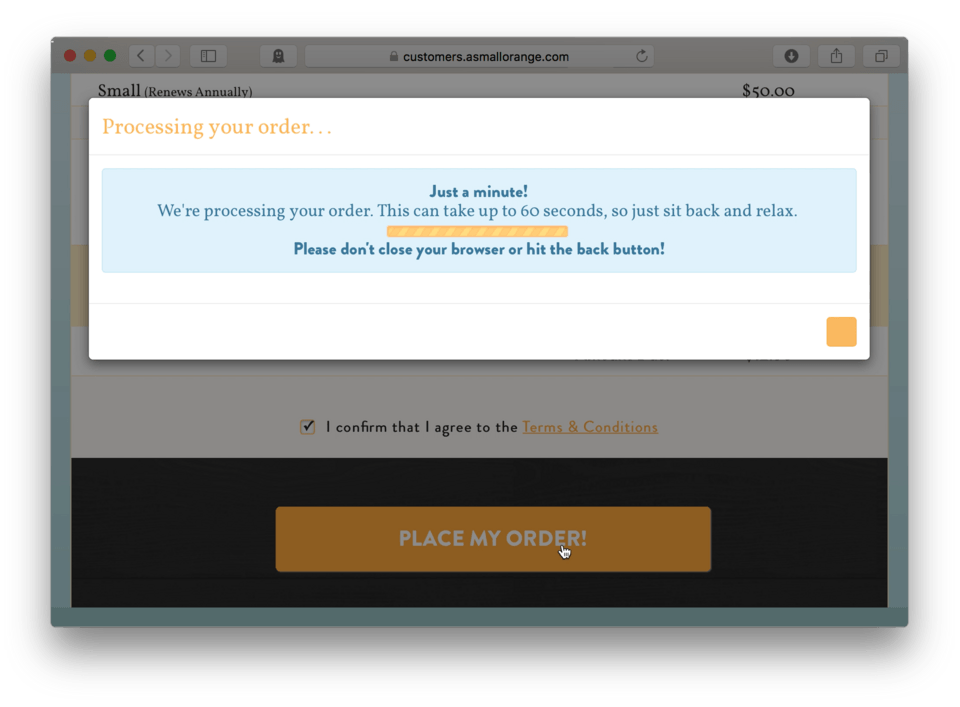
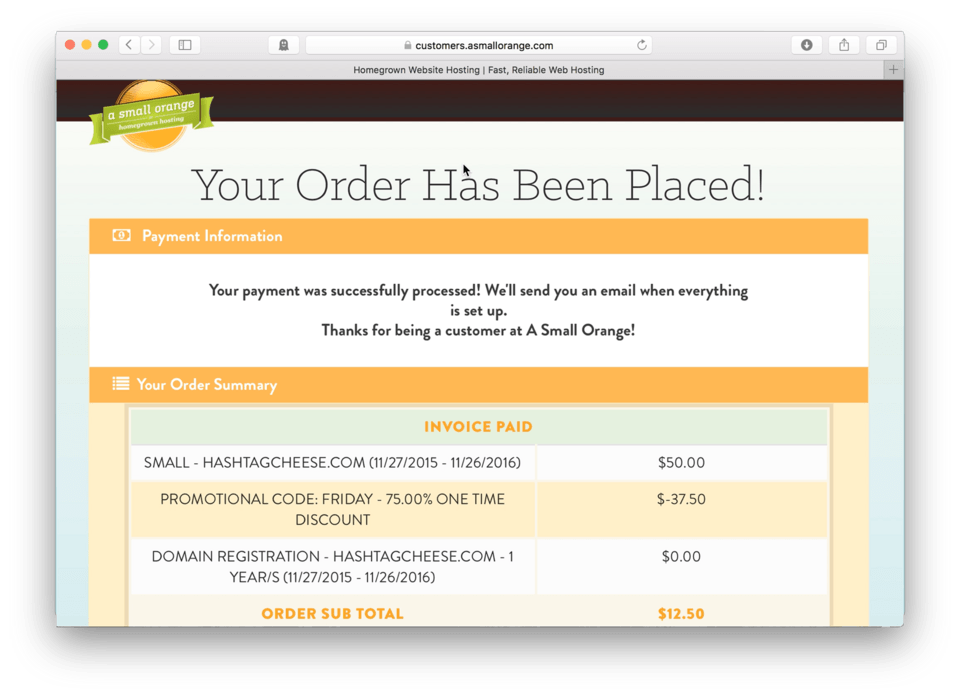
Just hold tight, don’t do anything until it is complete and you are taken to your Order Summary page. (fig. 10) You can review your purchase here. Also, it lets you know that the next step is to wait for a series of emails.
Parsing the Emails
Setting up hosting and domains is not an automated task, actual people at A Small Orange work to make sure that everything is correct with your purchase and then setup your account. You’ll need to wait till they email you with a notification that everything is setup and ready to go before we can move to the next step.
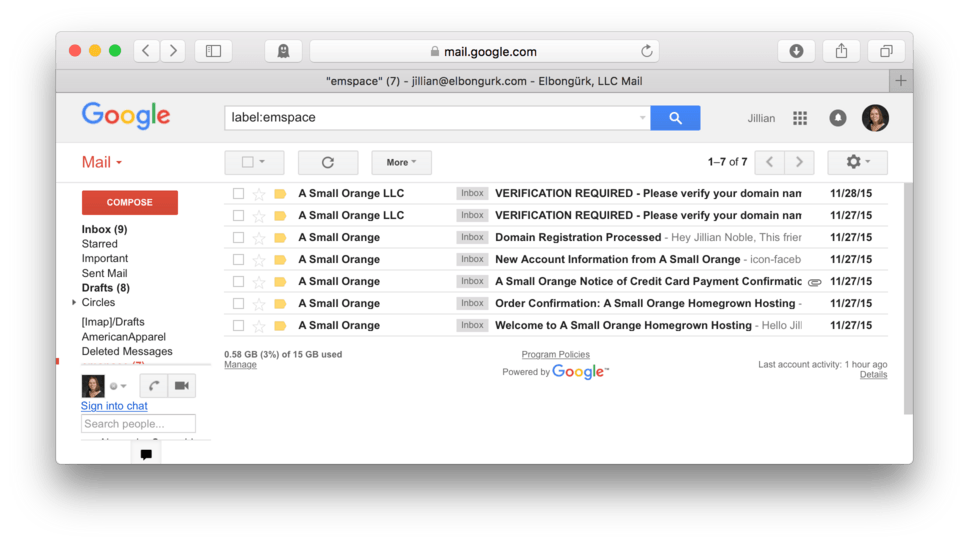
They move pretty quickly, so check your email often and you’ll see that you’ll eventually receive a ton of emails from them. Don’t be alarmed, typically you’ll see about six emails from them as you can see from my inbox in (fig. 11). Each one contains slightly different information and some are more important than others.
I’ll walk you through each of them pointing out the important bits.
My email stacks from the bottom up. I like to check them in order that they were received, so I’ll begin with the bottom one, the one with the subject line: Welcome to A Small Orange Homegrown Hosting….
As you can see in (fig. 12), this guy is a basic thank you for purchasing note. There aren’t really any specifics in here that we need to know about.
There are some links included in this email that help direct you to different parts of the A Small Orange website, but nothing that really needs to be written down. Most of this can be accessed by their homepage by simply logging in.

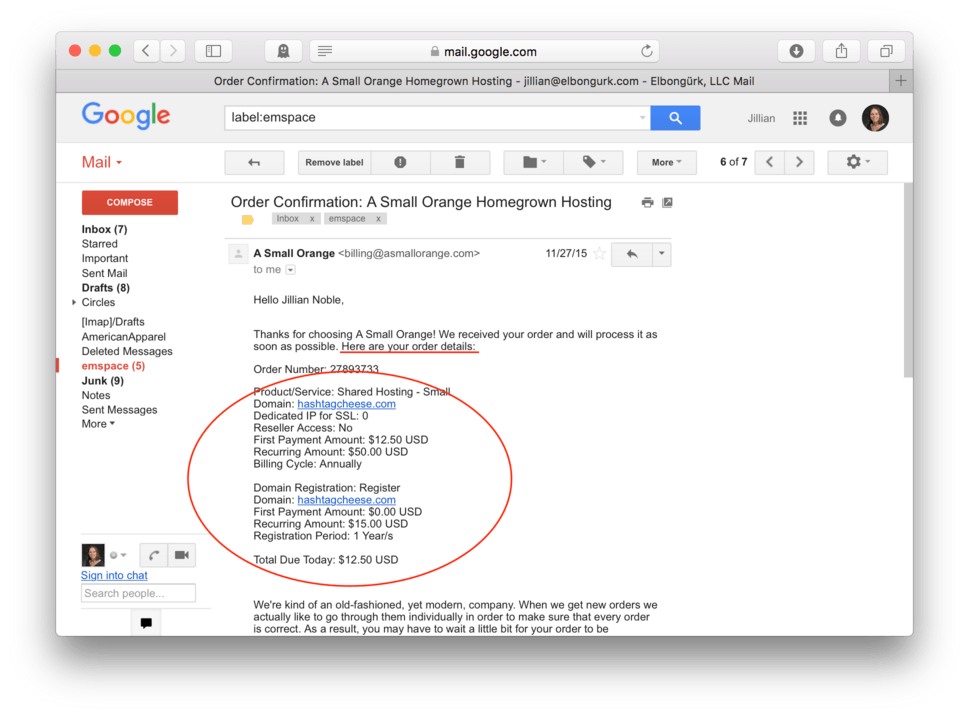
The next email should be your Order Confirmation. This note provides you with details like your order number and the listing of things that were included in your purchase. The primary purpose of this email is just to let you know that they received your order for the list of items specified and that it is currently being processed (fig. 13).
I wouldn’t delete this email just yet. It’s good to wait until everything is completely setup and you have things working until you clean house.
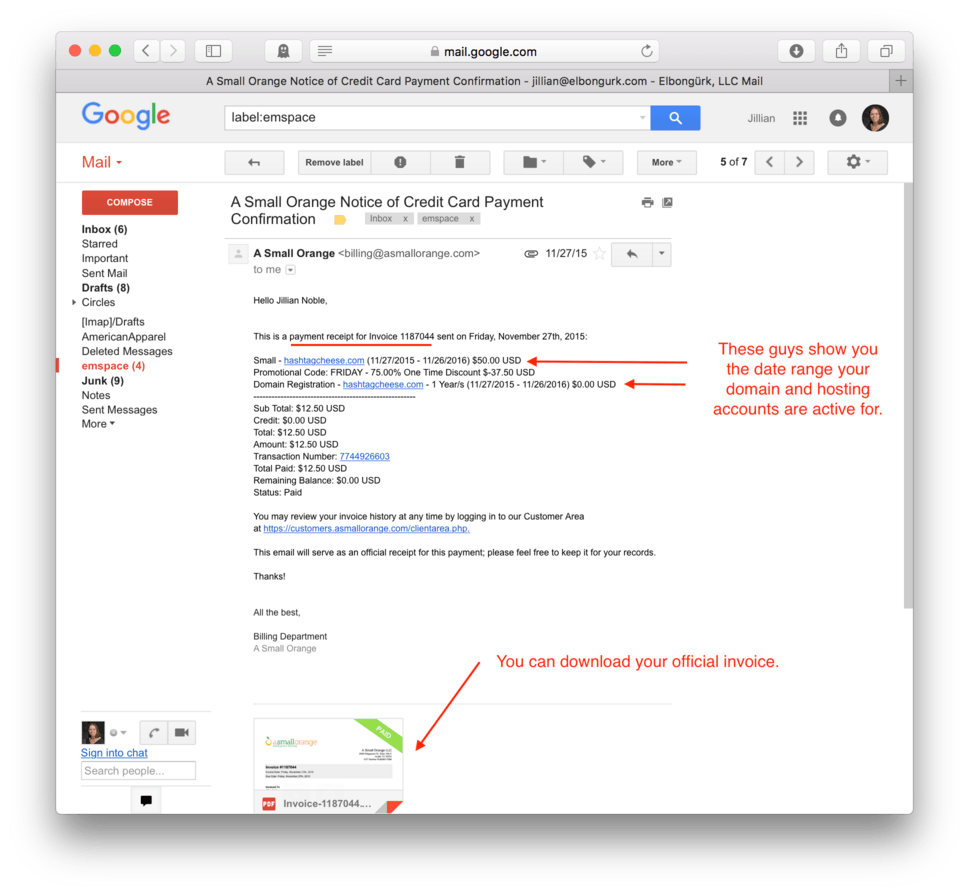
Next up should be your A Small Orange Notice of Credit Card Payment Confirmation. This email contains the confirmation that your credit card payment was received and accepted. You’ll see the charges applied and you can download a copy of your official invoice which should be included as a downloadable attachment. You’ll want to keep this attachment for your records.
The other bit of information you’ll want to record is the dates that your hosting and domain will be valid for. Typically these run on 1-year cycles, so it is important to know when these things expire so you can make sure to renew in time if you want to keep your site and your domain active. You’ll get notices when the time gets close, but it never hurts to stay organized (fig. 14).
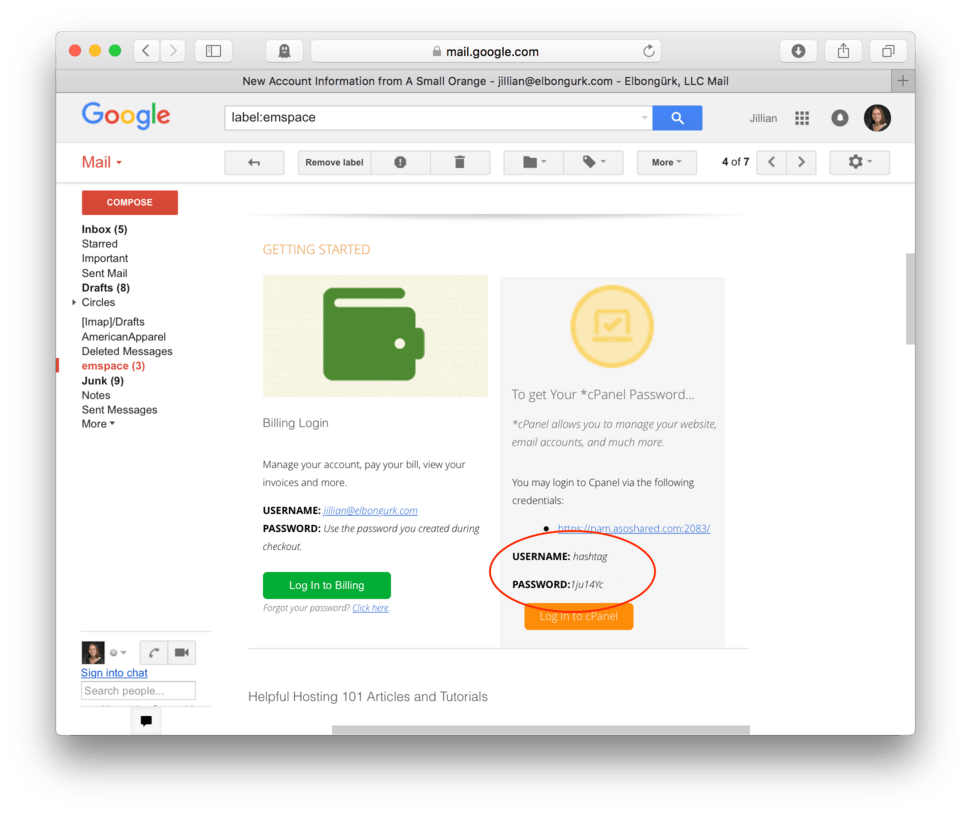
The next email is a very important one. This one has the subject line: New Account Information and contains your cPanel username and password.
cPanel is essentially access to your hosting account and will use a different username and password than your A Small Orange account that you set up when you purchased.
cPanel usernames and passwords are assigned to you. You can reset the password later, but for now make sure to write down the username and password provided in the section of this email labeled cPanel (fig. 15)
Domain processing can take a little bit, sometimes up to a day or two, but once you domain is officially processed you should receive and email that has the subject line: Domain Registration Processed. (fig. 16)
This email is simply a notification to let you know that the processing of your new domain name was successful and reminds you of the dates that your domain will be yours.
You do have to wait for this email before we can setup your site, but there isn’t any really important information contained inside of it. I wouldn’t delete it however, it will serve as a official record of your domain processing status.

The last email you should receive is a VERIFICATION REQUIRED email (fig. 17). There are certain policies put in to place that need to be followed. One of them is that domain names need to be verified to make sure you are the rightful owner of the domain.
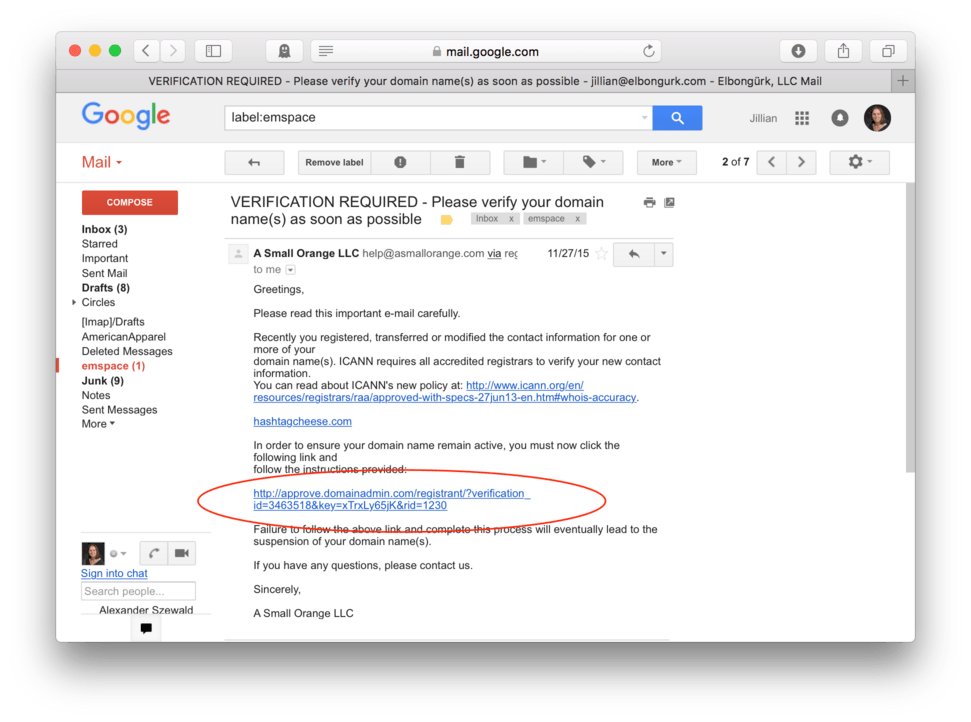
It’s a simple process. You’ll need to click the link provided in the email and be ready to enter your name and email address. The link will take you to the OpenSRS website verification page (fig. 18).

Simply type in your credentials required and hit the Verifiy button to complete the verification.
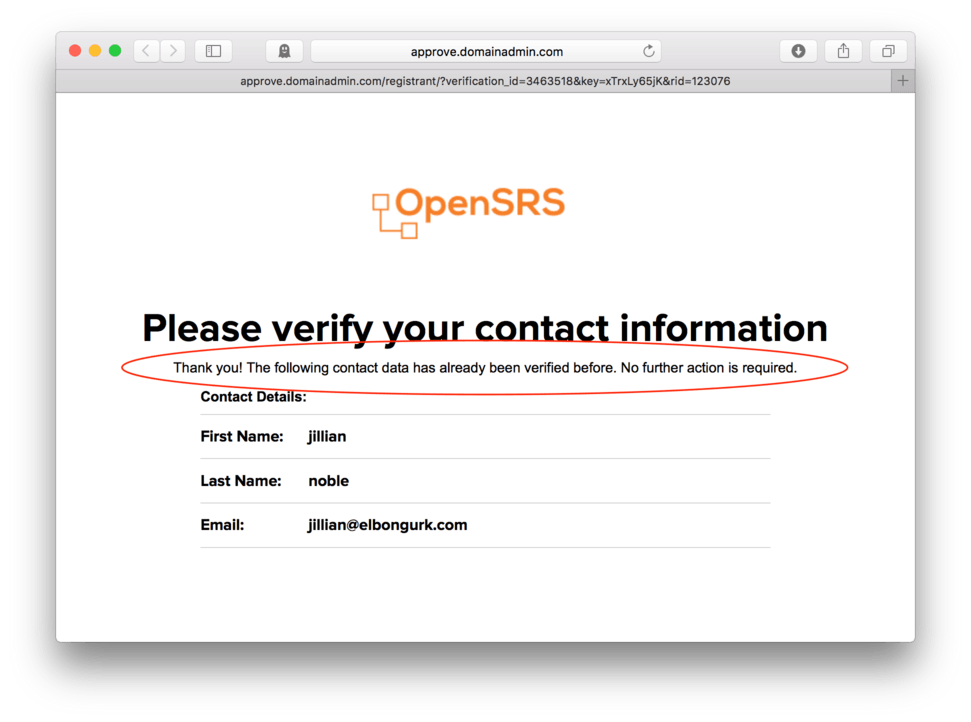
If you have already verified your domain, clicking that link in the verification email again will take you to a page letting you know that you are already verified (fig. 19). You can do this to double check if you have verified your domain or not.
You only have a small window of time (usually a week or two). You’ll get lots of email reminders if you don’t. I waited one day and got a second email request to verify.
That’s it. Now that we’ve had our domain processed and verified and we now have login credentials for our cPanel, we are ready to put our files online to get our site up and running.
Getting & Using an FTP Client
We are getting close to being online. We have a website ready to go (any will do at this point, but I suggest using lesson 17), we’ve purchased a hosting account and a domain name, and now we’ve made sure our domain has processed and we have our cPanel username and password ready to go.
The next step is to actually put our files on our host. To do this, we need to use some special software called an FTP client. FTP is an acronym that stands for File Transfer Protocol. There are many available FTP clients out there and lots of them are free, some are paid. Each has its own pros and cons.
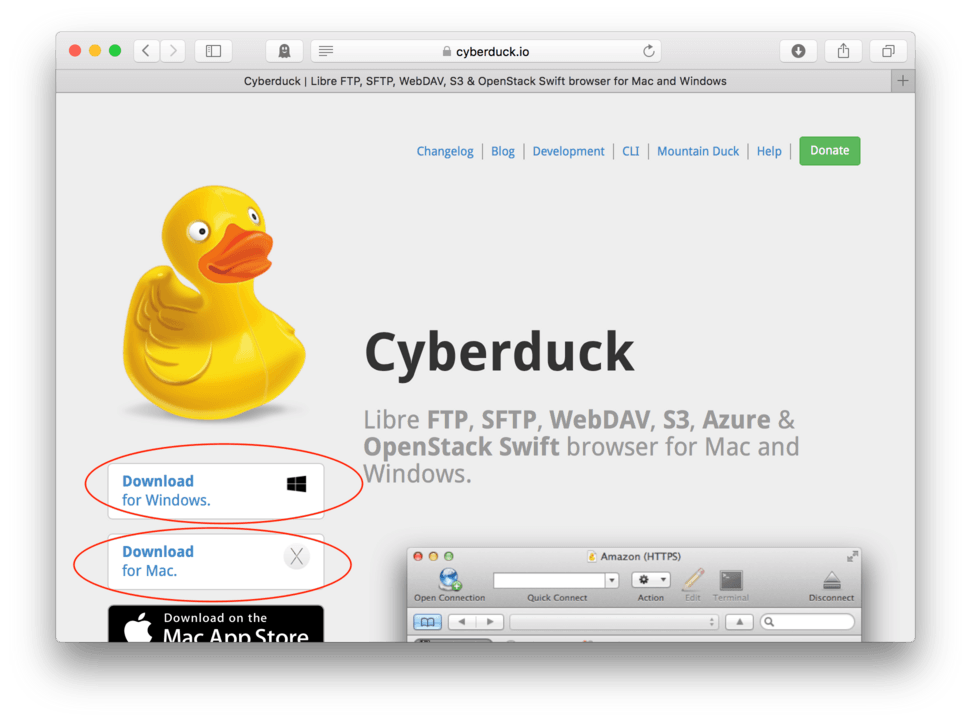
For this lesson, I’m going to walk you through downloading and using a FTP client called Cyberduck. It’s a free and relatively simple software that has served me well and I’m happy to recommend it here. It has versions for both MAC and Windows, so everyone should be able to use it.
We’ll need to download a copy. Visit Cyberduck.io and select either the MAC or Windows version from the options below the duck logo (fig. 20). It should begin an automatic download. Depending on your setup, you might be asked to save and download. Follow whatever typical download procedures you use on your particular computer setup.
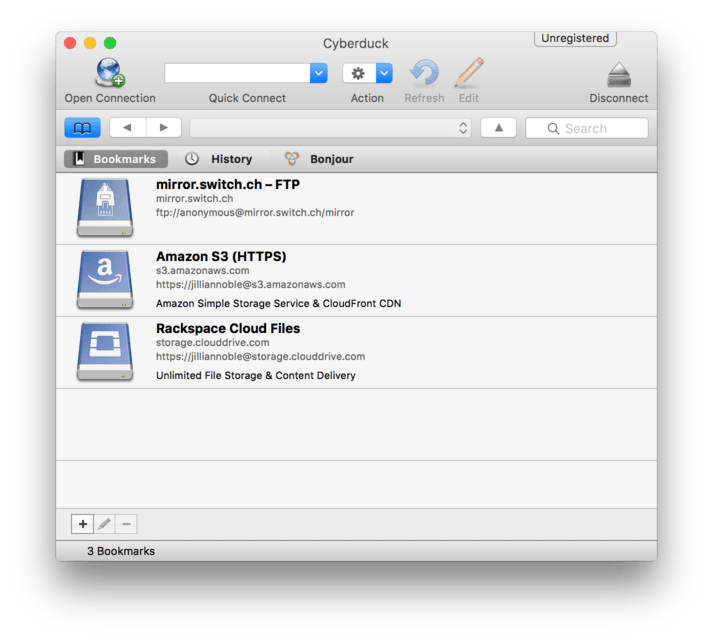
Once Cyberduck has downloaded, install and launch it. The initial screen should look something like (fig. 21). I already have a few other services hooked up. Don’t be alarmed if yours has other things or nothing already in the list.
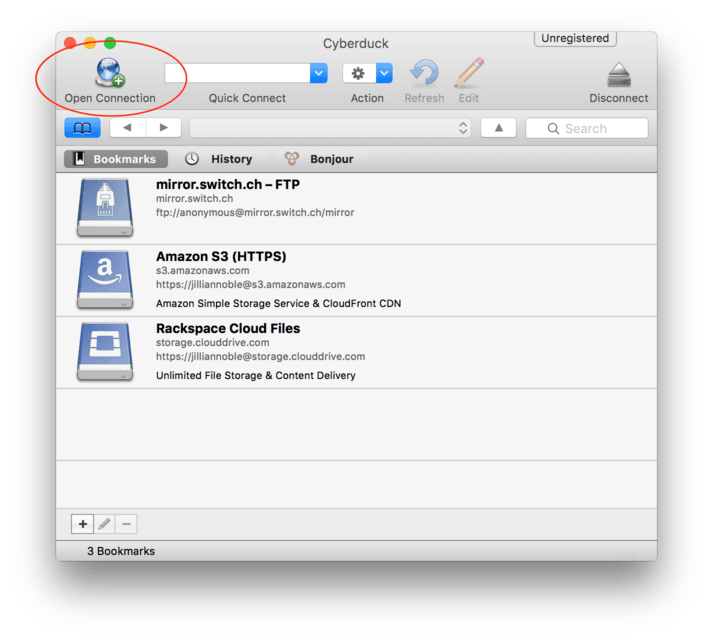
We need to establish a new connection. To do this we’ll need to click the globe and plus sign icon in the top right corner. See (fig. 22).
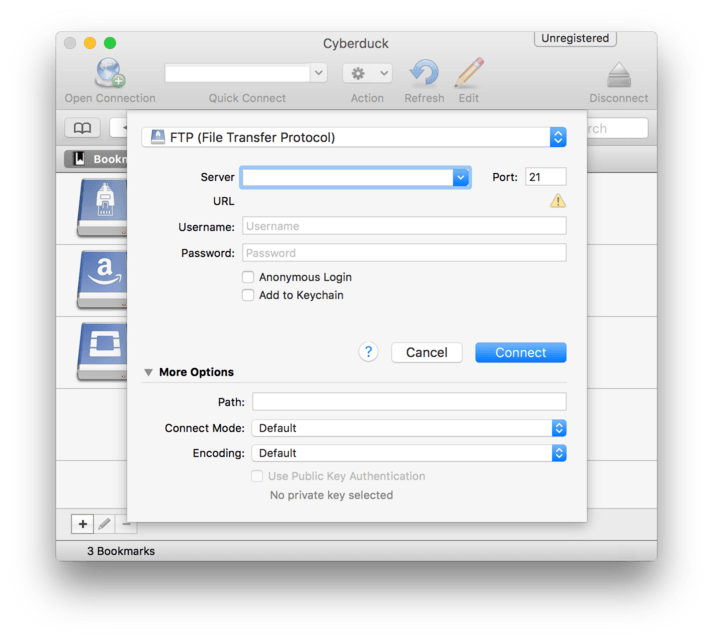
This will bring up a panel with a bunch of blanks. It should look like (fig. 23).
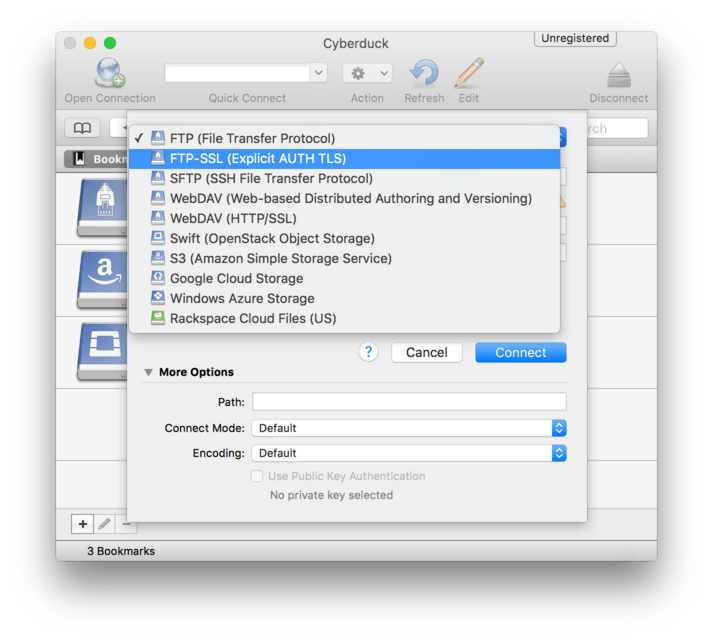
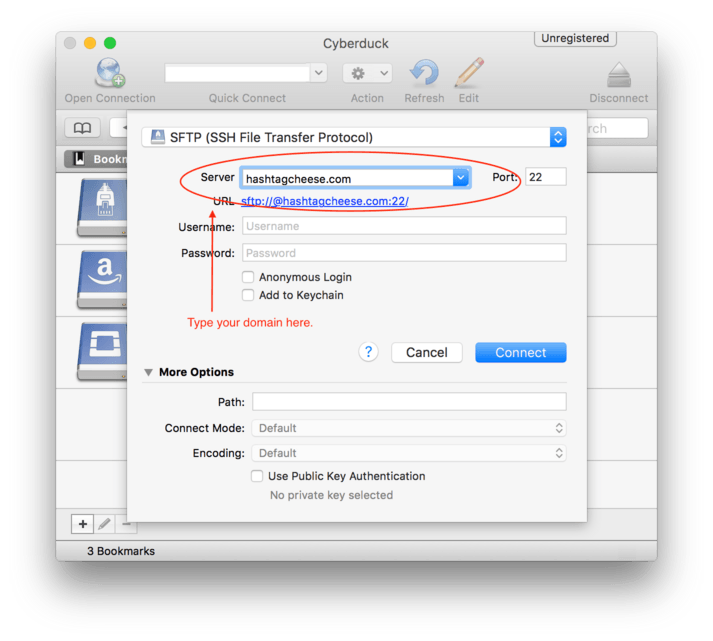
From the top dropdown, select SFTP. This is a more secure connection that will encrypt your data as it is traveling through the internet tubes. It’s unlikely that this data will be hacked on it’s way over, but it never hurts to use the extra security if we have the option. (fig. 24).
In the Server: blank, we’ll need to type in your domain name. I purchased “hashtagcheese.com” so that is what goes in that text field. You’ll need to substitute your own domain name (fig. 25).
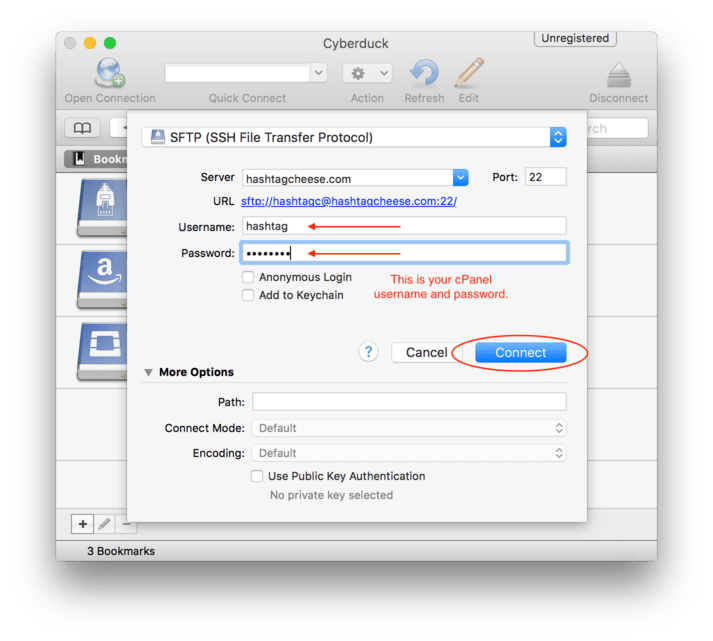
Next, we’ll fill in the Username and Password fields. This is the cPanel username and password that was provided in the New Account Information email from A Small Orange. (You can refer to fig.15 if you can’t recall it.)
Don’t worry about the More Options section. After you’ve entered your cPanel username and password, simply click Connect. See (fig. 26).
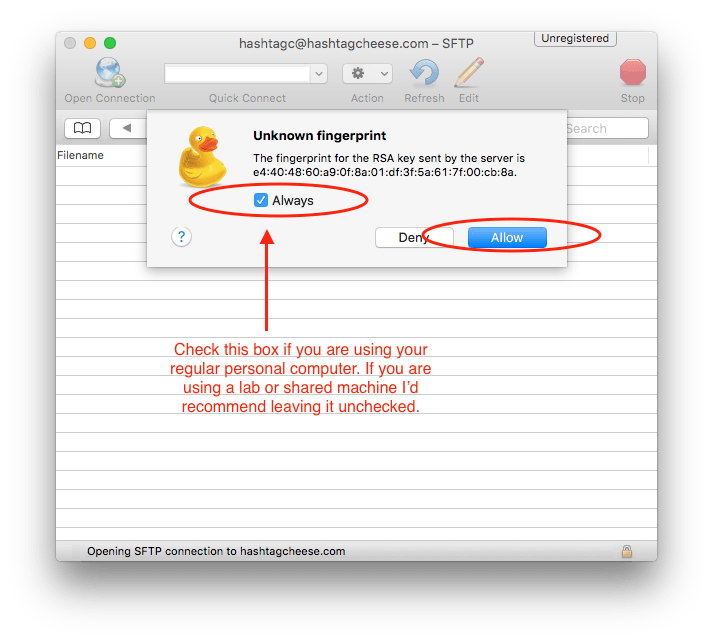
You might come across an Unknown Fingerprint message. This is letting you know that the server doesn’t recognize the computer that is trying to access it. This is because it is the first time you’ve ever tried.
If you are using your regular computer go ahead and check the Always checkbox letting the server know that your computer is always allowed to access it. Then click Allow to move to the next step. (fig. 27)
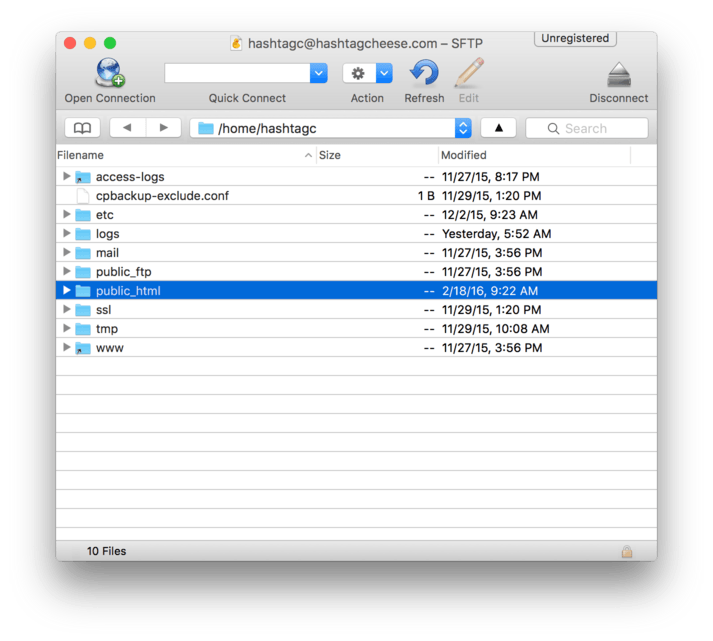
You’ll be taken to a directory with a list of files and folders (fig. 28). Most of these need to be left alone.
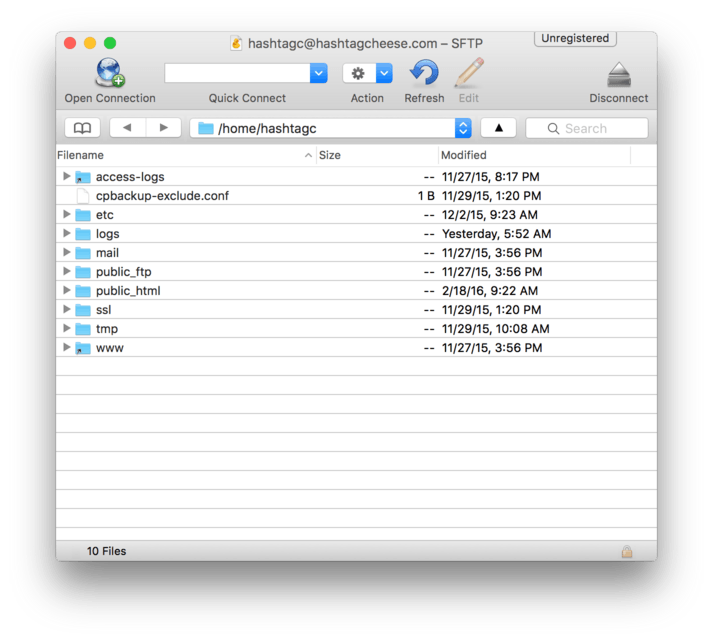
The only folder we will ever use is the public_html folder. Select that folder to open it. (fig. 29).
We’ll be taken to a new file and folder directory. This one should contain only one folder labeled cgi-bin as you can see in (fig. 30).
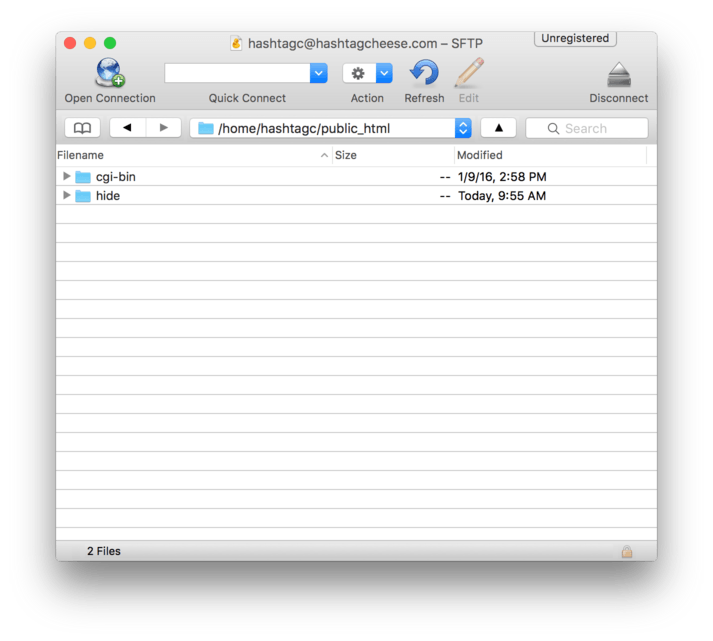
We won’t touch this folder either. Instead, we will move our lesson18 website so it lives side-by-side with the cgi-bin folder in here.
It’s important to know that we don’t need to include the root folder itself, but only the files contained in it. Locate your lesson 17 root folder. (fig. 31)
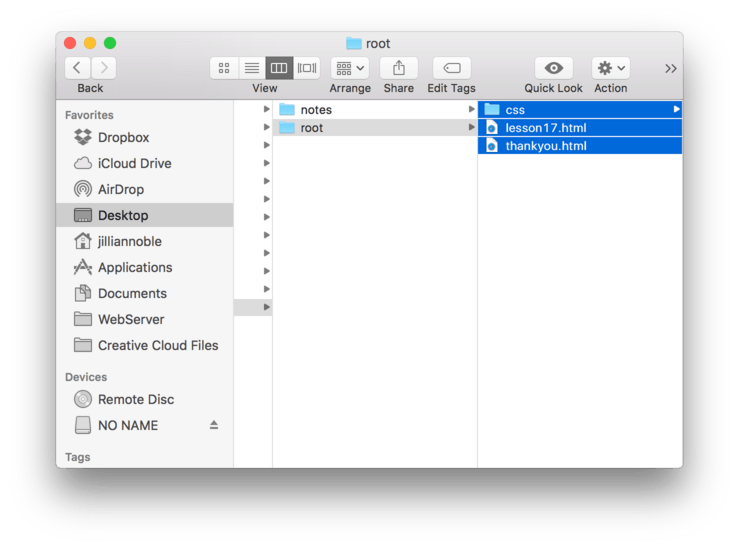
You’ll see that inside we have two files and two folders, our css folder and our js folder. We need to copy these four items into our public_html folder on our server.
Make sure lesson18.html, thankyou.html, and both folders are selected and hit Edit > Copy.
Next, we’ll move back to Cyberduck. We need to put these files into our public_html folder which should already be opened. Edit > Paste these files. (fig. 32).
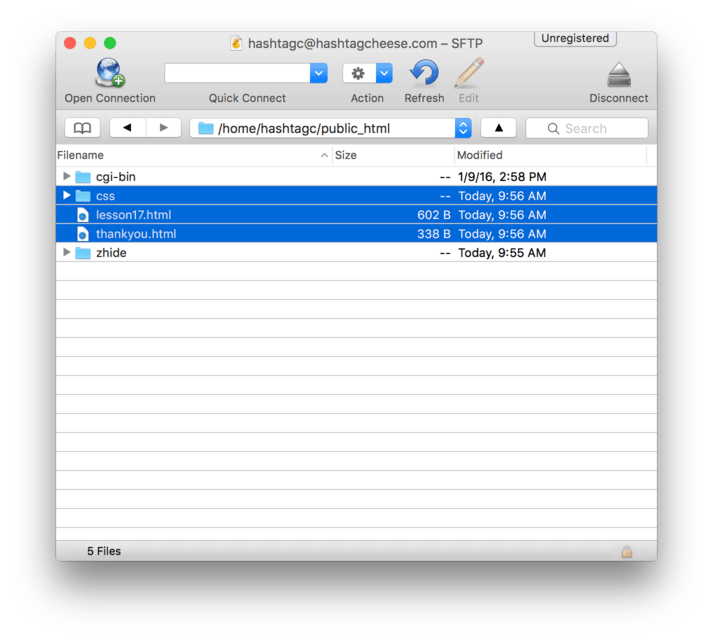
Your two html files and CSS folder should now appear here. We should still see our cgi-bin folder.
In order to let our browser know which page is our homepage, we’ll have to rename lesson18.html to index.html. The browser will automatically look for a file named index.html and use that as the first page of any website. We can select lesson18.html, and right click > rename. (fig. 33)
Note: From here on out we should start naming our pages like this. For any website you create, name your homepage index.html.
Now the fun part. Let’s launch our browser and type our domain name into the web address bar. (fig. 34)
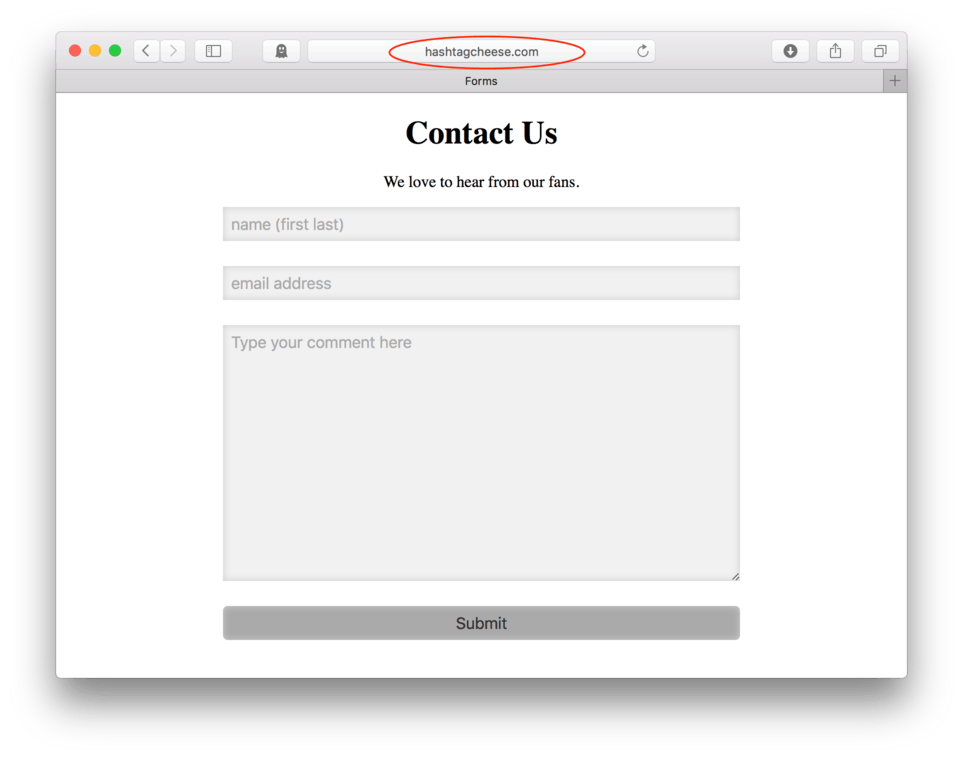
We should see the contact form that we created in lesson 17. Pretty darn cool right?
That’s it. We did it. We published a website. Now anyone who visits our website will be able to see our contact form.
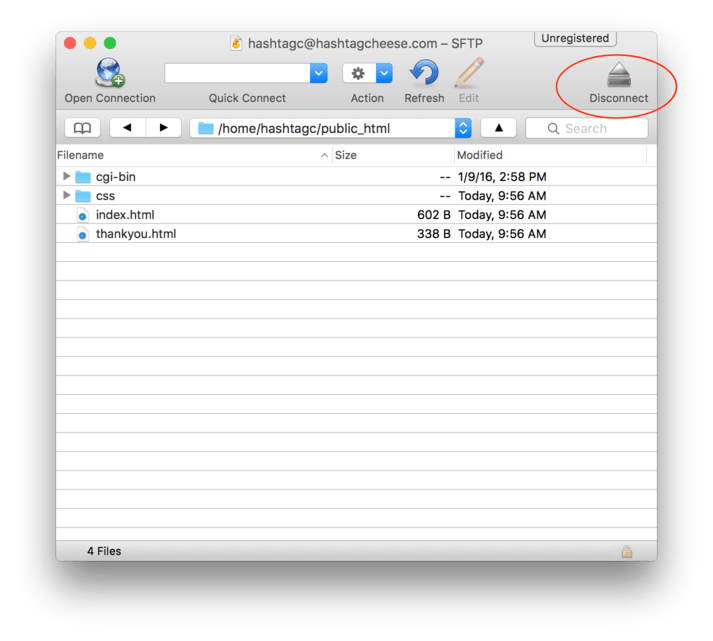
Let’s make sure to disconnect Cyberduck to make sure we don’t leave the pipes open unnecessarily. From the top right of the Cyberduck panel, click Disconnect. (fig. 35)
A Note on Naming
When we uploaded our files to Cyberduck, we had to change the name of our page to index.html. We needed to do this to identify the homepage of our site so the browser knew which page to display first.
For almost every lesson in this series we created a new html file, and we named it after the lesson (lesson01.html, lesson02.html, etc). I did this because I didn’t want any confusion in the beginning. I wanted it to be very clear which HTML file was which and I hoped you would get the hang of building root folders containing HTML files and subfolder for css, js, and images. I worried it would be too confusing in the beginning to name all our files the same, but I think now you are ready to hear the reasons why we do.
From here on out, we need to be really careful when naming our pages as we just saw here. We need to be mindful of which page is going to eventually be our homepage for our site and make sure to name it index.html. We want to avoid renaming it in Cyberduck (which is renaming it live on the server) for a few reasons. The first is that it is best practice not to edit things live on the server, it can cause unexpected errors that might be difficult to fix without contacting customer support.
The second reason is even more important. We want to name our files correctly from the beginning so that we don’t have to make tons of changes to our pages to make things work later. If I had built a full multi-page site with navigation, I’d likely have linked all my pages back to the homepage with a <a href="lesson17.html"> address. This would mean that I would have to change every address linking to the homepage in ever page of my site.
Instead, if I name my homepage index.html from the beginning, I’ll know that the address to link to my homepage is always href="index.html". When I move my files to my server, the naming will already be in place and my links will all work without huge changes. From here on out, for any site you build, name the homepage index.html, it’ll be a good habit and will save you time and frustration in the end.
Updating Elbongurk Forms (optional)
In lesson 17, we created a form and used a third-party service called Elbongurk Forms to process information in a simple contact page. Now that our contact page is live on our server, we can go back to Elbongurk Forms and enter our live redirect url.
If you created the account with me in lesson 17, you can follow these directions to point your redirect to the live thank you page. If you skipped that part, feel free to skip this next part too.
- Navigate your browser to Elbongurk Forms
- Login to your account
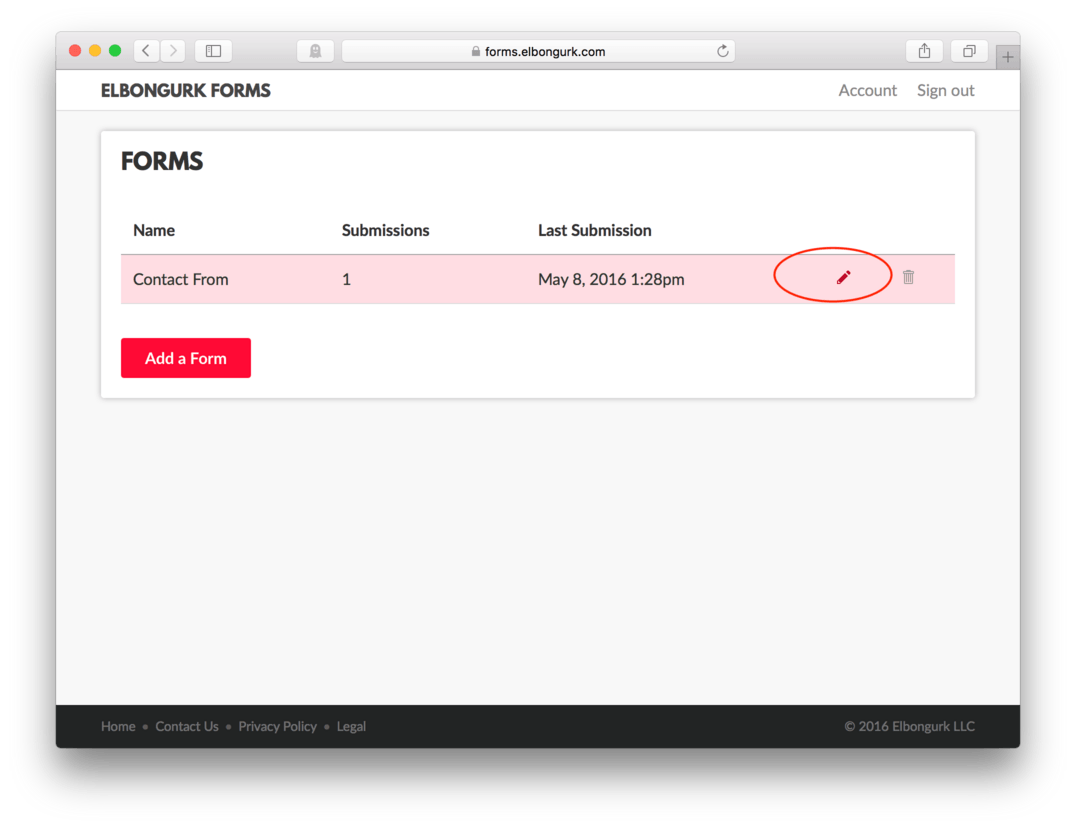
- To edit your form settings, Click the Edit button, the small pencil icon. (fig. 36)
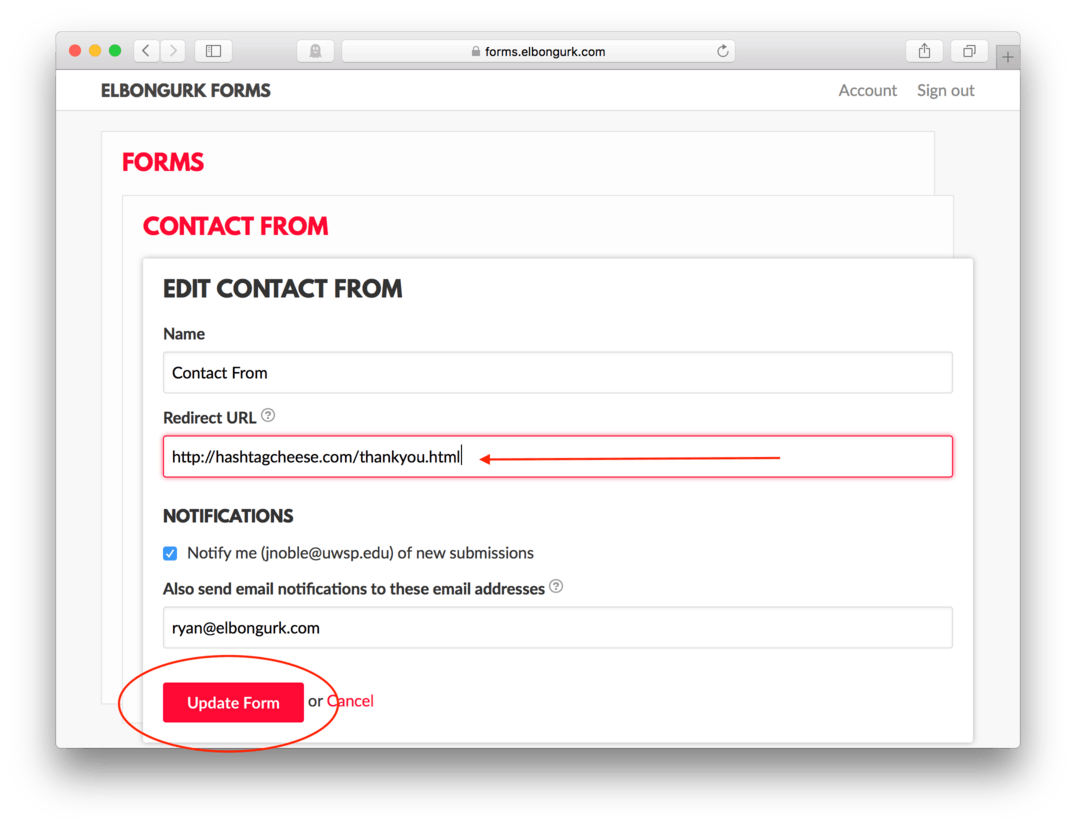
In the Redirect URL form field, we’ll change this to our new live address. Our address will have three parts:
- Any website will start with “http://”
- Next, will be your domain name, mine is “hashtagcheese.com”
- Next, will be a forward slash (same button as the question mark) and the file name of the page you have in your root folder. Mine is called “thankyou.html”
The full address of my redirect is:
http://hashtagcheese.com/thankyou.html
You can test it out by copying it and putting it in the browser address bar. It should bring up the thank you page even without filling out the form.
Once you have your redirect correctly typed, hit Update Form (fig. 37)
Now, lets test our live form to see if it worked.
Go back to your newly minted live webpage and fill out your form. Hit Submit when your finished. (fig. 38)
Did you get your thank you page? I hope so! Great job!
Now check your Elbongurk Forms account to make sure you received the submission and your email to make sure you got a notification.
Alright, so I also snuck in a little more form management into this lesson, I hope it was helpful.
Lesson Conclusion
In this lesson we covered just about everything you need to know to publish your website online. We learned about purchasing hosting and domain through a vendor.
We learned about managing the emails that come from that purchase and about what information was needed to login to our cPanel to access our server space.
We learned about downloading and using an FTP client to move our files onto our server. We now know that we shouldn’t touch any existing files or folders on our server and that our files need to go inside the folder labeled public_html. I walked you through some new rules for naming your files and from now on you know to name your homepage index.html so the browser knows which one is the first page to be displayed in a site.
Lastly, we briefly revisited our third-party form submission manager and updated our redirect to make sure that our live version of our site was there.
Congratulations! You did it! You now have enough skills built up to be dangerous in the world of web design. Thanks for reading! If you enjoyed this, make sure to check out my other courses.