Adding a Bit of JavaScript
- Adding a Bit of JavaScript
Overview
HTML and CSS do a pretty good job of displaying a webpage on their own, especially with the capabilities that CSS3 provides. However, there are times where we need just a little bit of extra help to make our sites the best they can be. In these cases, we often look to JavaScript to help us achieve the extra umpf we are looking for.
JavaScript allows us to do things like rotating slideshows, smooth animation transitions on our anchored navigation, and lightbox effects so we can view images in a collection larger without leaving our page.
JavaScript is a different kind of code than HTML and CSS. Though there are plenty of web designers that are able to write JavaScript, many others leave that job up to developers since it involves a certain understanding of computer programming rather than markup code like HTML. Lucky for us, developers are a generous bunch and offer different snippets for us to incorporate into our sites free of charge.
This lesson will demonstrate some examples of how prewritten JavaScript snippets can be incorporated into a website so we can take advantage of some common features that only JavaScript can offer.
Lesson Setup
Let’s create our lesson folder structure, our initial HTML file and connect it up with a new stylesheet.
Folder Setup
- Create a new Lesson16 folder inside of Bob
- Create the notes and root folders
- Inside the root folder, create an images folder and a css folder
- Download the lesson 16 resources from here.
- Move those images into your images folder for this lesson
HTML Setup
- Open up TextMate
- File > New to open a new file
- Code in your boilerplate HTML making sure to add a title to the page. I’m calling mine: Adding a Bit of JavaScript.
- Make sure that your boilerplate includes the
<meta name="viewport" content="width=device-width, initial-scale=1" />we learned in lesson 8 to ensure the site works properly on a mobile device. - Save your HTML file to your Lesson16 root folder with the name: lesson16.html
- Open and Preview your page in the browser, checking to make sure your page title is appearing correctly.
CSS Setup
- Open up TextMate
- File > New to open a new file
- File > Save
- Navigate to the “css” folder you created
- Name your file, style.css
- Hit Save
- Attach this stylesheet to our HTML page. Type:
<link href="css/style.css rel="stylesheet" />into the head section of our lesson16.html file. - File > Save the HTML file
Your HTML should now look like this:
<!doctype html>
<html>

	<head>
		<title>Adding a Bit of JavaScript</title>
		<meta name="viewport" content="width=device-width, initial-scale=1" />
		<link href="css/style.css" rel="stylesheet" />
	</head>

	<body>

	</body>

</html>
Note: You may have noticed that I’ve shortened the lesson setup to a list of action steps above. If you need a refresher on folder and file organization see the lesson 3 setup section.
Let’s test to make sure our pages connected correctly.
- Navigate back to your new CSS file.
- Let’s change the background color of the body element. Type:
body {on an open line and hit Enter - Now, type the property we want to change:
background-color: - Type:
pink;and hit Enter - Close the CSS block, type:
} - Save this file and Refresh the browser
If your background turned pink, then you are set. Everything is working correctly. You can go ahead and delete that CSS block, so we can start fresh.
Adding jQuery to Your Page
To make use of any prewritten JavaScript out there, we have to understand and prepare a few things in advance. Most JavaScript will be written to perform a specific task and more often than not it will only be a small amount of code that can be easily read and edited to suit a wide range of needs.
It’s our job as a web designer to understand that there are two different bits of code that need to be incorporated into our <head> section of our site to incorporate any prewritten JavaScript. First, we need to add a link to the jQuery library itself, a very large and robust code base that almost all JavaScript draws resources from, and second, we need to attach the bit of prewritten JavaScript that controls the feature we wish to add.
Lucky for us Google provides access to a whole bunch of libraries for free on developers.google.com, but the specific reference code we are looking for is jQuery 1.x snippet as seen in (fig. 1)

Google makes it easy for us to access and add the library. All we need to do is Copy the small chunk of code that appears after the 1.x Snippet: heading.
Here it is:
<script src="https://ajax.googleapis.com/ajax/libs/jquery/1.11.3/jquery.min.js"></script>
Note: Notice that the code begins with a
<script>and ends with</script>. All JavaScript links will look like this. You’ll also notice that inside the opening tag is asrc=attribute giving an address to where that bit of script (term for JavaScript code) lives. In this case it lives in a googleapis.com site.
And Paste it into our HTML head section.
I like to put mine below my stylesheet <link> like this:
<head>
	<title>Adding a Bit of JavaScript</title>
	<meta name="viewport" content="width=device-width, initial-scale=1" />
	<link href="css/style.css" rel="stylesheet" />
	<script src="https://ajax.googleapis.com/ajax/libs/jquery/1.11.3/jquery.min.js"></script>
</head>
Great. That is exactly what we need to do to give our webpage access to the full jQuery library. Now any bit of prewritten JavaScript will be able to draw from resources inside that library. Next, we’ll have to add another set of <script></script> tags that add whatever JavaScript function we wish to perform on our page.
Creating the JavaScript
Now if we want to add our own JavaScript to this site, we’ll need to create our own JavaScript file. This time, instead of just simply linking to an external website, like we did with the jQuery library, we will actually host this bit of code ourselves. It’s actually quite a bit like dealing with a stylesheet, so the process should seem somewhat familiar.
- Inside the root folder, create a js folder (short for JavaScript)
- Open up TextMate
- File > New to open a new file
- File > Save
- Navigate to the “js” folder you just created
- Name your file, script.js
- Hit Save
Adding JavaScript to Your Page
Just like if we had made a stylesheet, we would have to link it to our HTML page. The same thing applies here. We need to go our HTML page and use the same <script></script> tags we used to bring in the jQuery library to let the site know we have another JavaScript file to load, only difference is that this one lives in our root folder, so our address will need to reflect that. Let’s go ahead and create the link.
- Locate your HTML file
- After your
<script></script>tags linking to the jQuery library, hit enter to make room - Add:
<script src=" - Now, enter the address from this HTML page to that JavaScript file we just created:
js/script.js - End the address with a double quotation mark:
" - End the opening script tag:
> - Now, strangely enough, without adding any additional content, we add a closing tag:
</script> - Save the HTML file
Here’s how your head section of your HTML should look:
<head>
	<title>Adding a Bit of JavaScript</title>
	<meta name="viewport" content="width=device-width, initial-scale=1" />
	<link href="css/style.css" rel="stylesheet" />
	<script src="https://ajax.googleapis.com/ajax/libs/jquery/1.11.3/jquery.min.js"></script>
	<script src="js/script.js"></script>
</head>
Note: It’s very important that you put the link to the jQuery library first and then any other JavaScript link after that. Order is important. The browser installs resources from the top down, so it needs to install the jQuery library before it installs our slideshow.js for things to work properly.
Adding a Rotating Banner
The first JavaScript feature we’ll be working on is a rotating banner. These types of banners are now becoming a very popular feature, especially on ecommerce websites.
Incorporating a large rotating banner allows you to show off many images in the same spot on your page. You can use these images to promote sales, give extra company information, or show off any products that your company might be offering.
The role of the JavaScript in the case of a rotating banner, is literally to create the rotation between any number of images. JavaScript is able to not only create the transition between any images tagged specifically for the banner, but also it controls the transition speed and type.
The Banner JavaScript
Since We’ve already incorporated the jQuery library into our site earlier in this lesson, we can focus now on the JavaScript written specifically to create our banner. The script we will be using for this lesson initially comes from Jonathan Snook, but has been restructured for our purposes.
Let’s first take a quick look at the prewritten JavaScript that we will use for our slideshow:
$(function() {
  $('#slideshow img:gt(0)').hide();
  setInterval(function() {
    $('#slideshow :first-child')
      .fadeOut(1000)
      .next('img')
      .fadeIn(1000)
      .end()
      .appendTo('#slideshow');
  }, 4000);
});
Are you feeling a little overwhelmed?
Me too.
That is the thing I was talking about earlier. Cleary JavaScript is a much different kind of animal than HTML or CSS. It’s the reason that many designers rely on programmers and developers to write the JavaScript components for our sites.
There are a few things that I want to point out about the code that we’ll need to know to make this work with our site:
- The first and most important are the
'#slideshow'references throughout the JavaScript. Similair to CSS, these are selectors that are telling us our slideshow will need to have anid="slideshow"in order for the JavaScript to be able work with it. - The next is the
4000value sitting at the end. This number controls the amount of time between transitions. Larger numbers provide for more time on each slide between the transitions and lower number will allow less time on each slide. - Third is the
.fadeOut(1000)and.fadeIn(1000). These numbers control just how long the cross fade between the slides takes. Once again larger numbers provide a lengthier cross fade and lower numbers a shorter cross fade.
That is all we’ll really worry about in the top portion of our JavaScript.
Adding the Script to our Page
Now that we’ve taken an initial look at the JavaScript we’ll be using, let’s add it to our site.
- Find your script.js file you created eariler and open it in TextMate
- Copy the JavaScript from below in its entirely:
$(function() {
  $('#slideshow img:gt(0)').hide();
  setInterval(function() {
    $('#slideshow :first-child')
      .fadeOut(1000)
      .next('img')
      .fadeIn(1000)
      .end()
      .appendTo('#slideshow');
  }, 4000);
});
- Paste the JavaScript into your script.js file
- Hit Save
Alright, now lets move on to setting up our HTML.
Setting up our Images to Be Rotated (HTML)
We saw when we dissected bits of the JavaScript code used to create our slideshow, we saw that we needed to use id="slideshow" to indicate the element that the JavaScript should work with. So for our slideshow, we’ll use with a <figure> element with id="slideshow" and inside we’ll have three <img> elements, each containing an image of the same exact size to rotate.img
For images, we’ll use three already located in your images folder: banner_01.png, banner_02.png, and banner_03.png.
Let’s get started.
- Locate your HTML
- Inside the
<body>tags, begin your figure element:<figure id="slideshow">and hit Enter - Add your first image:
<img src="images/banner_01.png"/> - Add your second image:
<img src="images/banner_02.png"/> - Add your third image:
<img src="images/banner_03.png"/> - Close your figure element:
</figure> - Save your HTML
Here’s how your HTML should look:
<figure id="slideshow">
	<img src="images/banner_01.png"/>
	<img src="images/banner_02.png"/>
	<img src="images/banner_03.png"/>
</figure>
and here’s how it looks in the browser. (fig. 2)
We can see that we already have most of what we are looking for. We have a rotating banner that switches between the three images, but the switch isn’t very smooth, the images aren’t responsive, and we don’t really need any margins here. To address these issues, let’s turn to our CSS.
Setting up our Images to Be Rotated (CSS)
In this case, the CSS can get a little bit complicated so I’m going to provide the code you can use in your site and make changes as you see fit.
- Locate your CSS file
- Copy the CSS code below:
img {
  max-width: 100%;
}

#slideshow:after {
  content: "";
  display: table;
  clear: both;
}

#slideshow img {
  float: left;
  margin: 0 -100% 0 0;
}
- Paste this code into your CSS file
- Save and Refresh
and here’s how it looks in the browser. (fig. 3)
You can see we are close. We now have a functional reponsive slideshow. The only other thing we might want to do is get rid of the white edge around the edges. That is being caused by the default margin on the body, we can remove that by using our universal selector * { and setting our margin and padding to 0.
- Locate your CSS file
- At the top of your CSS, Add:
* { - Add:
margin: 0; - Add:
padding: 0; - Close the block:
} - Save and Refresh
Here’s my CSS:
* {
  margin: 0;
  padding: 0;
}

img {
  max-width: 100%;
}

#slideshow:after {
  content: "";
  display: table;
  clear: both;
}

#slideshow img {
  float: left;
  margin: 0 -100% 0 0;
}
and here’s how it looks in the browser. (fig. 4)

As you see, that did take care of our white edge. Our banner now fully extends to the edge of our browser window.
Note: We can add as many images as we want to our slideshow. It is just a matter of adding additional images to our figure tag. Also, it’s worth reminding you at this point that any images you want incorporated into the slideshow need to be the exact same height and width. Other sizes will rotate, but the slideshow will jump from size to size and look very messy.
That wraps it up. You now know how to create a rotating banner using some simple HTML, a bit of prewritten CSS, and a chunk of prewritten JavaScript.
An Alternative Mobile Navigation
A few lessons back we worked on creating mobile navigation using a hamburger button and a footer navigation. That is still a great way to go, but if you would like a navigation that slides from the hamburger button, you’ll need to incorporate some JavaScript to do the heavy lifting.
The Navigation JavaScript
Since we’ve already incorporated the jQuery library into our site earlier in this lesson, we can focus now on the JavaScript written specifically to create our sliding mobile navigation. The script we will be using for this comes initially from an open source resource library created by thoughtbot, but restructured for our purposes.
Like before, let’s first take a quick look at the prepackaged JavaScript that we will be using in this example.
$(function() {
  var menuToggle = $('#menu-button').unbind();
  $('#menu-items').removeClass("show");
  menuToggle.on('click', function(e) {
    e.preventDefault();
    $('#menu-items').slideToggle(function(){
      if($('#menu-items').is(':hidden')) {
        $('#menu-items').removeAttr('style');
      }
    });
  });
});
Now, if we look closely at the script, we can pick out the #, which should be a familiar character. In this case, the # is being used like it would in the CSS, it means element with a specific id= attribute. So in this case we can see that the JavaScript will be scanning our HTML for two elements, the first is an element with the id="menu-button" and the second is an element with the id="menu-items".
I know these id names are a little different than we are used to because they a using a hypen, but really they shouldn’t be treated any differently. We just need to keep this in mind when we are coding our HTML, we need to make sure that we don’t make any errors in naming our elements to match.
Okay, now let’s go ahead and add this JavaScript to our script.js file:
- Find your script.js file you created eariler and open it in TextMate
- Copy the JavaScript from below in its entirely:
$(function() {
  var menuToggle = $('#menu-button').unbind();
  $('#menu-items').removeClass("show");
  menuToggle.on('click', function(e) {
    e.preventDefault();
    $('#menu-items').slideToggle(function(){
      if($('#menu-items').is(':hidden')) {
        $('#menu-items').removeAttr('style');
      }
    });
  });
});
- Make some room below the slideshow JavaScript by hitting enter a few times
- Paste the JavaScript into your script.js file
- Hit Save
Now your script.js file should look like this:
$(function() {
  $('#slideshow img:gt(0)').hide();
  setInterval(function() {
    $('#slideshow :first-child')
      .fadeOut(1000)
      .next('img')
      .fadeIn(1000)
      .end()
      .appendTo('#slideshow');
  }, 4000);
});

$(function() {
  var menuToggle = $('#menu-button').unbind();
  $('#menu-items').removeClass("show");
  menuToggle.on('click', function(e) {
    e.preventDefault();
    $('#menu-items').slideToggle(function(){
      if($('#menu-items').is(':hidden')) {
        $('#menu-items').removeAttr('style');
      }
    });
  });
});
Setting up our Navigation (HTML)
We saw when we took a look at the JavaScript code used to create our navigation that we needed to use id="menu-button" and id="menu-items" to indicate what is to be used in the JavaScript.
We need to add id="menu-button" to the link we will be using to open and close our navigation and id="menu-items" to name the unordered list that will hold our items that belong in the navigation.
Building Our Navigation
Let’s begin by giving ourselves a bit of semantic structure to make sure we stay in the habit of being organized and specific about what we make.
I think it’s best if we begin with the creation of a header.
- Locate your HTML file
- After the body tag, but before the figure element that we use for our banner, add:
<header>and hit Enter - Now, just to make sure we don’t forget, let’s close that tag, add:
</header> - Good, now because we are working on a navigation, let’s add:
<nav>and</nav>to identify the parts of the code involved in the navigation.
Here’s how your HTML should look so far:
<header>
	<nav>
	</nav>
</header>

<figure id="slideshow">
	<img src="images/banner_01.png"/>
	<img src="images/banner_02.png"/>
	<img src="images/banner_03.png"/>
</figure>
That’s a good start, now let’s add a link that will be used as our menu button. We’ll use a simple text link using the word MENU as our button text. For the destination address we’ll use a blank space to let the browser know that this link does not need to go anywhere since its purpose is only to trigger our JavaScript. Also, we cannot forget that we need to use the id="menu-button" that our JavaScript will be looking for.
- Inside our opening
<nav>let’s add our text link:<a href=" " id="menu-button">MENU</a> - Save and Refresh
Here’s how your HTML should look now:
<header>
	<nav>
		<a href=" " id="menu-button">MENU</a>
	</nav>
</header>
and here’s how it looks in the browser. (fig. 5)

As we’d expect, we now have a text link that has popped up in the top left corner of our site. We’ll do some styling a little later, but for now, let’s move on to building our links.
Everything Uses an Unordered List
You already know that almost all navigation will use an unordered list to organize links, this is no exception.
We’ll use three items in our navigation: Portfolio, About, and Contact.
- Locate your HTML
- Inside the
<nav>tags, following your<a/>, begin your unordered list :<ul id="menu-items">and hit Enter - Add your first text link as a list item:
<li><a href=" ">Portfolio</a></li> - Add your second text link as a list item:
<li><a href=" ">About</a></li> - Add your third text link as a list item:
<li><a href=" ">Portfolio</a></li> - Close your unordered list:
</ul> - Save your HTML
Here’s how your HTML should look:
<nav>
	<a href=" " id="menu-button">MENU</a>
	<ul id="menu-items">
  	 	<li><a href=" ">Portfolio</a></li>
    	<li><a href=" ">About</a></li>
   	 	<li><a href=" ">Contact</a></li>
	 </ul>
</nav>
and here’s how it looks in the browser. (fig. 6)

We can see that we have our MENU button and our three links ready for styling.
Setting up our CSS
Let’s get started by making this header setup a little cleaner and more professional. First, let’s eliminate our underline on our menu button link, change its color to black, and give it a little padding which will mean changing its display mode to display: inline-block.
- Locate your CSS file
- Add:
#menu-button {as a selector above your code that controls our slideshow - Add:
text-decoration: none; - Add:
color: black; - Add:
display: inline-block - Add:
padding: 1em; - Close the block:
}
Here’s my CSS:
...

#menu-button {
	text-decoration: none;
	color: black;
	display: inline-block;
	padding: 1em;
}
and here’s how it looks in the browser. (fig. 7)

Okay, so that looks pretty good, but since this a mobile navigation, we should check it with our browser set to Responsive Design Mode. As a common mobile device, let’s use the iPhone 6 as we have for our other lessons. (fig. 8)
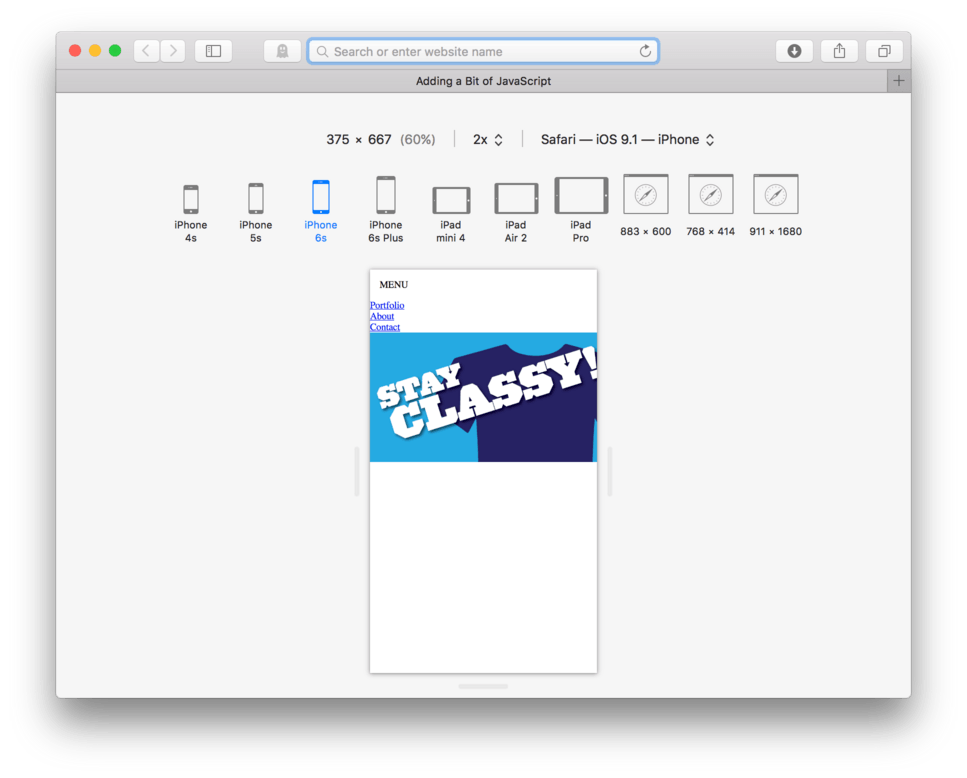
Good deal. Our menu button is looking pretty good. Now to deal with our navigation items. Like our banner, the CSS that runs this is a little heavy, so I’m going to give it to you to Copy and Paste into your code. I’ll then walk you through the area you may want to adjust to suit your needs.
Below is the CSS used to style the list item links.
- Copy this code block in its entirely:
#menu-items {
  display: none;
  width: 100%;
}

#menu-items li {
  background-color: #e7f1ec;
  line-height: 60px;
  padding: 0 1em;
}

#menu-items li a {
  color: #333;
  text-decoration: none;
}
- Paste it into your CSS file after you styling related to your menu button.
- Save your CSS and refresh your browser.
and here’s how it looks in the browser. (fig. 9)
We did it, we made a menu that slides out from the top. Pretty nice, right?
Okay, now to show you where you can make adjustments. There really should only be a few things that you would consider adjusting, these are type color, background color, and justification (meaning right aligned on the screen rather than left).
Changing Link Background Color
To change the background color of the links, right now it is a light green (#e7f1ec;), you’ll adjust the background-color: property of this specific CSS block already in your code:
#menu-items li {
  background-color: #e7f1ec;
  line-height: 60px;
  padding: 0 1em;
}
Changing Link Text Color (or any other link text property)
To change the text color of the links, right now it is a grey (#333;), you’ll adjust the color: property of this specific CSS block already in your code:
#menu-items li a {
  color: #333333;
  text-decoration: none;
}
If you’d like, you could also turn back on the underline or add in any other text properties you’d like to adjust on the link text (font-family, font-size, etc).
Aligning the Menu to the Right
If things have gone according to plan, we should be able to change our alignment from left to right, by simply asking our nav { to text-align: right;.
- Locate your CSS file
- Add:
nav {near the top of your CSS, before you start talking to your menu button. - Add:
text-align: right; - Close the block:
} - Save and Refresh
Here’s my CSS:
nav {
	text-align: right;
}
and here’s how it looks in the browser. (fig. 10)
Ta da! Right aligned.
To make this menu official, don’t forget to update each of the link address is the list item so that they go to actual internal site pages, anchored links on the same page, or external webpages.
Other JavaScript Resources
So, now that you have a feel for how you can integrate JavaScript into your website, you can start looking for other snippets that are out in the wild. I’d recommend looking at codepen.io. It’s a great resource for any designer or developer to share code samples. You can also take a look at my personal codepen. I have a few others that are pretty simple to follow you can find there.
Make sure you look closely at either any instructions provided, or at the JavaScript code to find any references to classes (.class-name) or ids (#id-name) and compare it closely to the HTML and CSS provided in the example. That way you’ll be able to understand how it could integrate it into your own page.
Lesson Conclusion
In this lesson we dipped just a toe in to what JavaScript can do and how it can be worked into a page design. The goal was to give you an understanding of how HTML and CSS still are the foundation of any webpage, and JavaScript, though not necessary, can be a great additional bit of interactivity and action to any page.
I also wanted to provide an understanding for the role of a designer and the role of a programmer or developer in making webpages work.
Next up, we will learn how to use forms.