Custom Web Fonts
Overview
When designing a website, you’ll encounter tons of styling decisions. Many times the site you’ll be creating will be part of a larger brand that will require certain colors, images, writing, and in many cases specific fonts.
Fonts have been a long standing hurdle in the world of web design for many years. Lucky for us, now it’s getting easier and easier for us to use custom fonts in our websites. This lesson will explore the different techniques for incorporating fonts into our pages.
Lesson Setup
To get started, we’ll need to first get organized. We’ll need to create our lesson folder structure, our initial HTML file and connect it up with a new stylesheet.
Folder Setup
- Create a new Lesson10 folder
- Now, add the notes and root folders
- Inside the root folder, create your images folder and your css folder
HTML Setup
- Open up TextMate
- File > New to open a new file
- Code in your boilerplate HTML making sure to add a title to the page. I’m calling mine: Custom Web Fonts.
- Make sure that your boilerplate includes the
<meta name="viewport" content="width=device-width, initial-scale=1" />we learned in lesson 8 to ensure the site works properly on a mobile device. - Save your HTML file to your Lesson10 root folder with the name: lesson10.html
- Open and Preview your page in the browser, checking to make sure your page title is appearing correctly.
CSS Setup
- Open up TextMate
- File > New to open a new file
- File > Save
- Navigate to the “css” folder you created
- Name your file, style.css
- Hit Save
- Attach this stylesheet to our HTML page. Type:
<link href="css/style.css rel="stylesheet" />into the head section of our lesson10.html file. - File > Save the HTML file
Your HTML should now look like this:
<!doctype html>
<html>

	<head>
		<title>Custom Web Fonts</title>
		<meta name="viewport" content="width=device-width, initial-scale=1" />
		<link href="css/style.css" rel="stylesheet" />
	</head>

	<body>

	</body>

</html>
Note: You may have noticed that I’ve shortened the lesson setup to a list of action steps above. If you need a refresher on folder and file organization see the lesson 3 setup section.
Let’s test to make sure our pages connected correctly.
- Navigate back to your new CSS file.
- Let’s change the background color of the body element. Type:
body {on an open line and hit Enter - Now, type the property we want to change:
background-color: - Type:
pink;and hit Enter - Close the CSS block, type:
} - Save this file and Refresh the browser
If your background turned pink, then you are set. Everything is working correctly. You can go ahead and delete that CSS block, so we can start fresh.
What is a Font
We encounter fonts every day. Most of us are familiar with at least a handful of very common ones, Times New Roman, Arial, Comic Sans (for better or for worse), Helvetica just to name a few examples. Anyone who routinely encounters a computer can name probably at least three font names just off the top of their head. Because right out of the box every computer is preloaded with fonts and font choices, people forget or never even consider what a font actually is or how it works.
A Brief History of Fonts
Way back when, before computers, we still had fonts. We’ve really had fonts since the advent of printing. A font used to refer to metal type (like the kind used today in letterpress printing). A font then, was a particular size, weight, and style of any typeface. So, if we had a font, that could be that we had in our typecase a full character set of 12pt, Times New Roman, Italic or 14pt Baskerville Book.
Each typeface was essentially what we now think of as a font, but then each typeface meant a bunch of potential fonts. Printers would have to purchase various fonts, even of the same typeface to make sure they had all the characters in the various sizes and styles that they would need. As you can imagine, this was a very costly thing and the variety of fonts that any printer had was dependent on lots of things, budget being a primary determining factor.
The idea that a font was something that was created and owned was not a difficult one when it came to metal type. If you wanted a font, you had to buy one or borrow one from somebody who owned it. There wasn’t any ambiguity on where they came from or that they were owned like any other type of property.
Today, our digital world complicates the idea of fonts. Since the vast majority of us don’t have to think about them because they seem to just magically appear on our computers, it’s too easy to assume that they are somehow free or inconsequential. In reality though, fonts are created and owned just like they always were, it’s just that now much of the responsibility for purchasing and using fonts falls on the user, which in most cases is the designer.
Fonts are Software
So the term font is still used in digital typography, but we would be more correct to use the word typeface instead. A typeface includes all the sizes, styles, and weights where the word font still officially describes a subset of any typeface, but is misused so frequently that they have essentially become one idea. This is largely because the typefaces included on any given personal computer often has all the fonts available, they seem like a packaged set.
Though it might seem that way, the typefaces that come preinstalled on your computer aren’t free. The come because of licensing agreements between certain companies and font foundries (companies that own and sell fonts). Apple and Microsoft just to name two of the biggest players both have agreements with font companies. They have to pay to use those fonts on the system. You might not notice because you didn’t have to pay separately, but the cost of those fonts was included in the cost of your computer.
I bet if you dug deep enough into the fine print you would find information about the legal terms for the fonts installed on your computer. I’d be willing to bet that somewhere you would find information about what you can and cannot do with the fonts that came on your system and among those rules would be that you couldn’t sell them to anyone else. This is because those fonts are proprietary software, just like Photoshop or MS Word and like those software packages, they were licensed to you by the owner/creator with certain rules for their use.
Type Designers
Designing typefaces is a real job. It is a very legitimate speciality area in the world of graphic design. These designers, called type designers, spend all day drawing, digitizing, scrutinizing, and packaging all those tiny little characters and their bazillion combinations into various typefaces. To create a single typeface takes an extraordinary amount of time and a keen sense of detail.
It is very easy to overlook the tiny font package, to just figure it comes to being through some sort of computer magic, but this simply isn’t the case. It represents hundreds or even thousands of hours of work by a well trained specialist. The final package is a beautiful piece of software. And like any software, it has copyright laws to protect it. This is as it should be. A type designer should be paid for their work just like any other professional out there.
Copyright
As I already mentioned, fonts are protected by copyright. This means that that only the font creator has any rights over how the final font is used, sold, edited, etc. A font is essentially an original artwork just like any painting, novel, or scientific invention.
Copyright law protects creators, and anyone who infringes on those rights can be punished. Copyright infringement can have some very serious penalties. Often the punishment is in the form of fines, but it is not unheard of to see jail time. So using a font that you do not have permission to use is a direct infringement on copyright and doing so is risking punishment.
So you may be wondering where I’m going with this. How does this relate to web design? Well, copyright is at the heart of the problem. If you remember back to lesson 3 where we learned that we could change our font-family: property from serif; to sans-serif;? We were able to do that without worry because we were only requesting that the users computer display a sans-serif font already installed on their computer over a serif font already installed on that same computer.
When we don’t specify a font, or even when we do, by default all we are really doing is telling the browser on our users computer to dig in the fonts already installed on that particular machine. If it already has a font installed that will do the trick, it will display it. If it doesn’t, then the browser usually has a fallback just to display something that is already installed.
Font Fallbacks
I could write a CSS request like this: font-family: 'Times New Roman';. This would tell the browser to display Times New Roman if it existed on the computer. If it didn’t, then the browser would have to use something else. We can request our own fallback by adding another font request following our first like this: font-family: 'Times New Roman', serif;. This is saying, if you have Times New Roman display it, if you don’t, then just go ahead and find a serif font, close enough.
We can write multiple fallbacks if we wanted the browser to look for another font before falling back to just a simple serif like this: font-family: 'Times New Roman', Georgia, serif;. Here the browser would look for Times New Roman on the system, if it couldn’t find that, it would look for Georgia, and if that wasn’t there, it would find a serif and display that.
I think by now you are getting the message that fonts by default anyway, don’t come along with the website. Websites are dependent on the fonts installed on the user’s computer. There was a good group of fonts that were installed on just about every computer in existence (like Times New Roman) so we could predict at least to a certain extent what most people would see. We couldn’t, however, ensure that everyone saw the same thing. In the last decade or so, as web design evolved, people became more and more interested in specifying exact fonts and began looking for ways to use fonts that were not necessarily installed on the users computer.
Emergin Options
Luckily, the web world has been working on the issue of using exact custom fonts for quite some time. We now have a variety of options for using exact custom fonts each with their own set of pros and cons. There are really two different ways: hosted and self-hosted. Let’s take a look at each briefly before we put them into action.
Hosted
When we say “hosted” fonts, we are saying is that the font doesn’t live on our root folder. Instead that font lives somewhere else on the internet. Certain font companies and services will host fonts and provide designers with access to those fonts by providing a link to the fonts on their server. Copyright issues are managed and monitored by the hosting company. There are really two major models for hosted fonts, paid and free.
Many font foundries and type designers offer paid options for using their fonts online. You’ll see subscription based models whereas the designer you pay monthly to have access to a certain font or set of fonts. You are paying for the rights to use the font on your site and also for the oversight the company provides to make sure that the copyright doesn’t get violated. Essentially as the designer, you are buying the right to use a certain font in your site and to be exempt from worry about copyright violations.
Free hosted fonts are similar to paid hosted fonts in that another company actually takes care of hosting the files and provides access to those fonts. The major difference here is that you don’t actually have to pay for the service. The most famous company doing this is Google.
Pros
- No worries about managing your own font hosting
- Typically slightly easier to setup than self hosted fonts
Cons
- Privacy issues (Your site can now be tracked by these companies)
- Often need to manage subscriptions and accounts for paid services
- Often limited to a certain number of fonts or sites for paid services
Examples
- Google Fonts (Free)
- Adobe Edge Webfonts (Free)
- Adobe Typekit (Paid)
- Cloud Typography (Paid)
Self-Hosted
When you self-host fonts, it means that you are actually uploading your own font files (in a folder, just like your images) for browsers to download and display in your webpages. There are both paid and free models for this as well.
Pros
- Full control of your content
- You own (rather than rent the fonts)
- Good variety
- No tracking of font use by third parties (privacy issues)
Cons
- You are responsible for policing copyright
- Your are responsible for managing hosting
- Costs (you are paying for the hosting of the font files)
Examples
- Font Squirrel (Free)
- Fontspring (Paid)
Using Google Fonts (Hosted)
Google Fonts is a great resource for free hosted web-fonts. It has a huge and growing number of fonts to choose from and makes it really easy for designers to link to them using just a simple attached stylesheet.
To get started, let’s type in a little content.
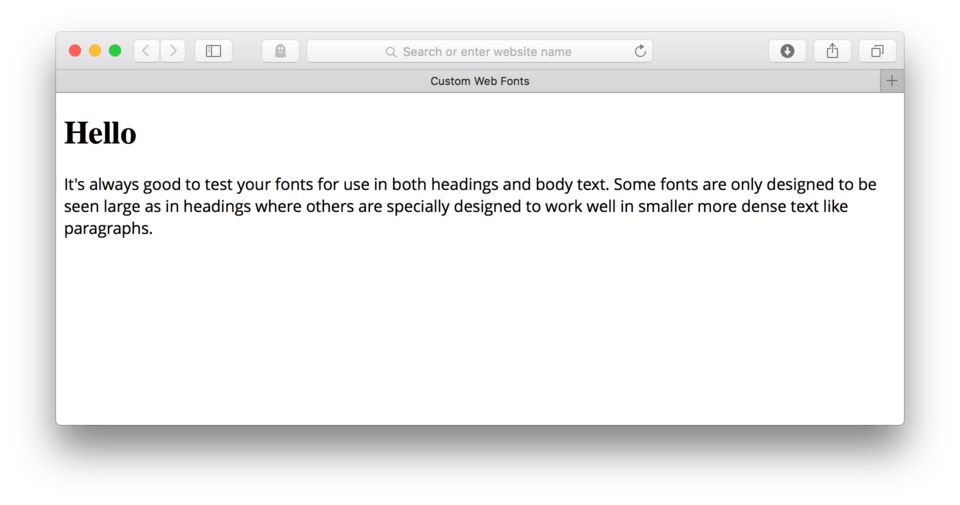
- Locate your HTML file
- Add
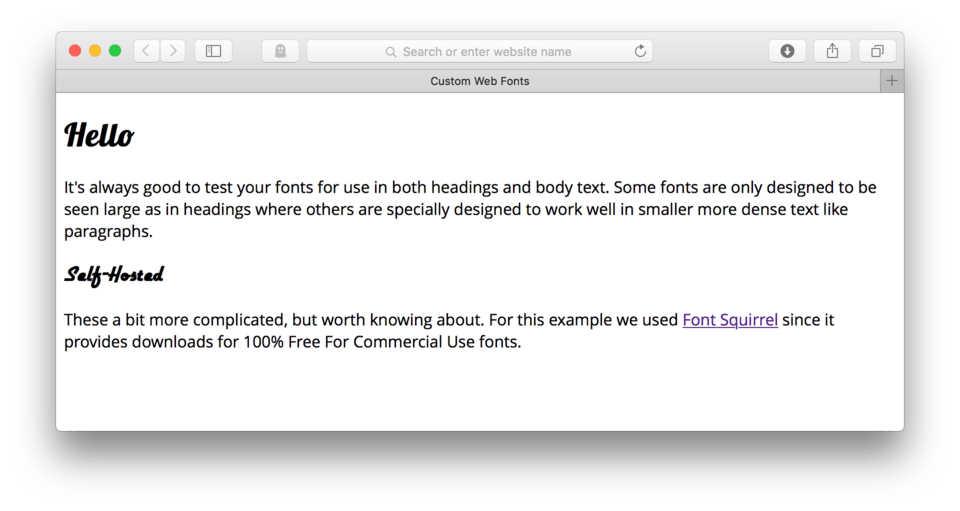
<h1>Hello</h1> - Add the following paragraph:
<p>It's always good to test your fonts for use in both headings and body text. Some fonts are only designed to be seen large as in headings where others are specially designed to work well in smaller more dense text like paragraphs.</p>
- Save and Refresh
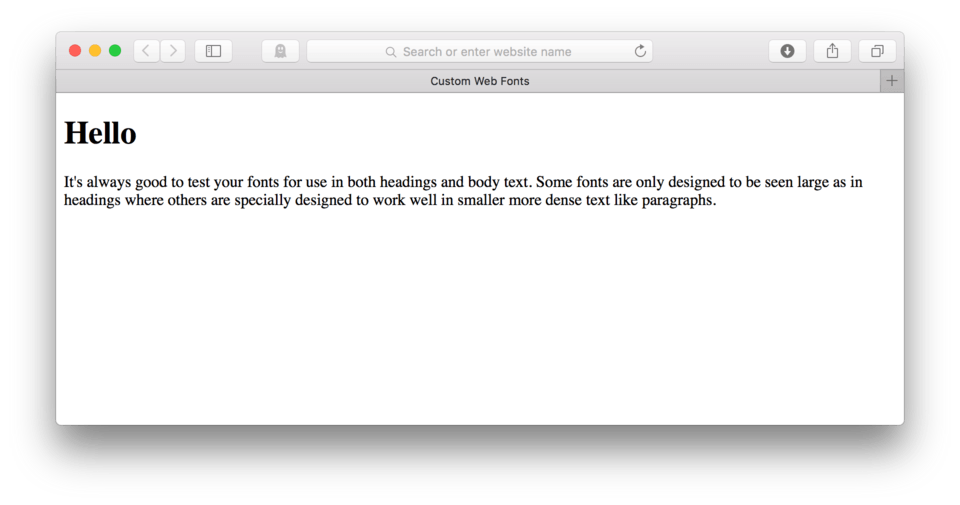
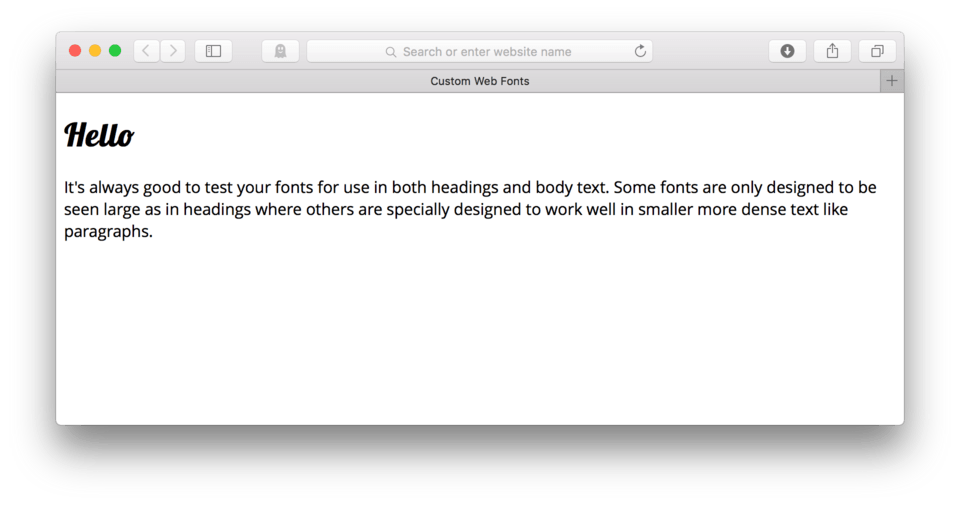
Here’s how your HTML should look:
<h1>Hello</h1>
<p>It's always good to test your fonts for use in both headings and body text. Some fonts are only designed to be seen large as in headings where others are specially designed to work well in smaller more dense text like paragraphs.</p>
and here’s how it looks in the browser. (fig. 1)
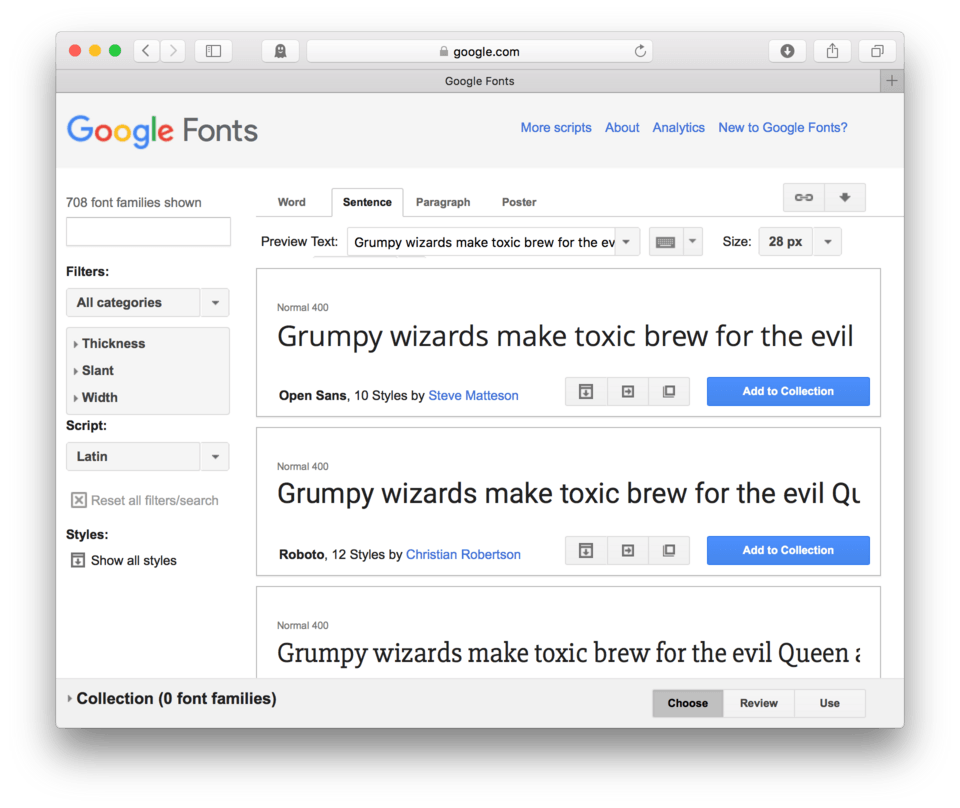
Next, we’ll need to find a suitable web font to apply using CSS. We’ll be using Google Fonts.
- Navigate to Google Fonts.
Here’s what you should be seeing. (fig. 2)
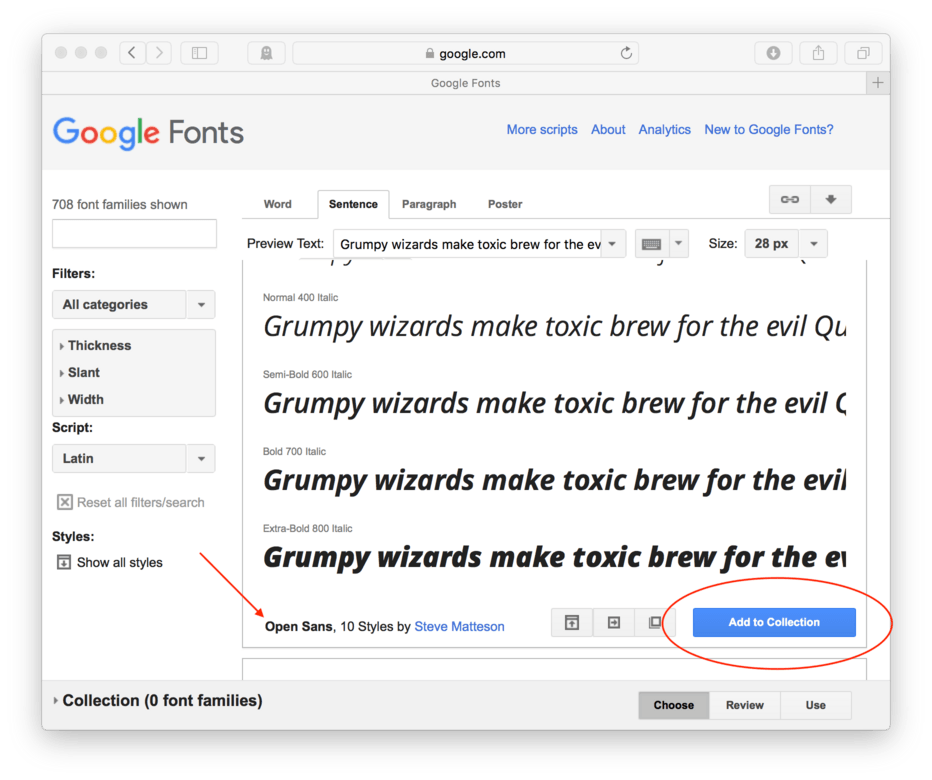
If you scroll the page, you’ll see tons of fonts to choose from. Each typeface is displayed in its own outlined box with a preview, in the bottom left you can see the name, the number of styles available, and the contributor. (fig. 3)
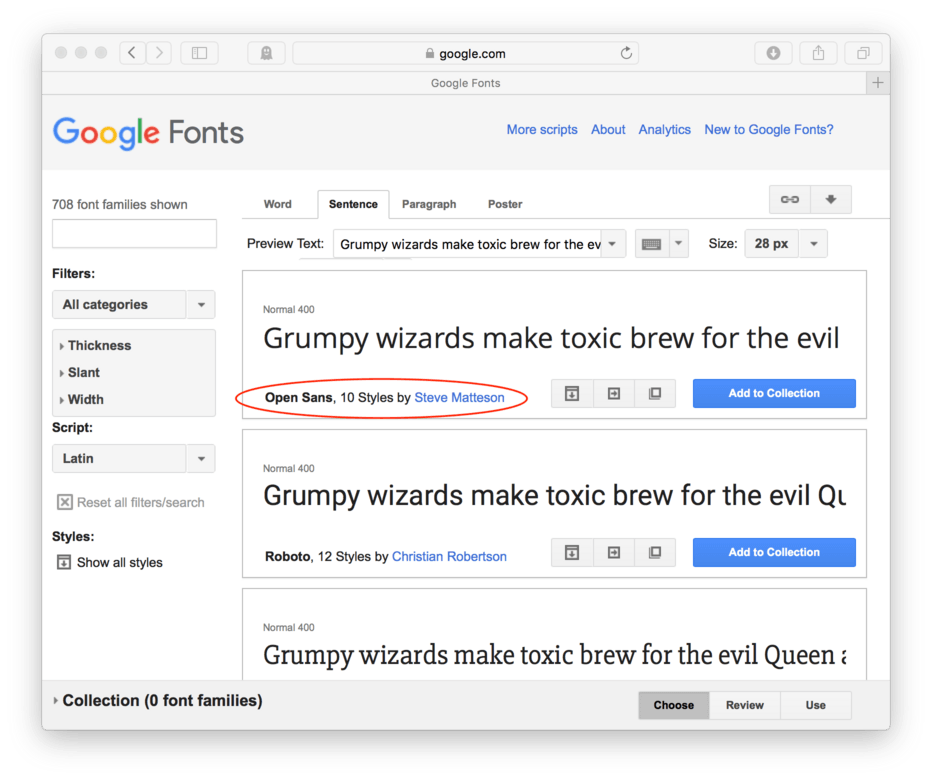
- Let’s choose Open Sans
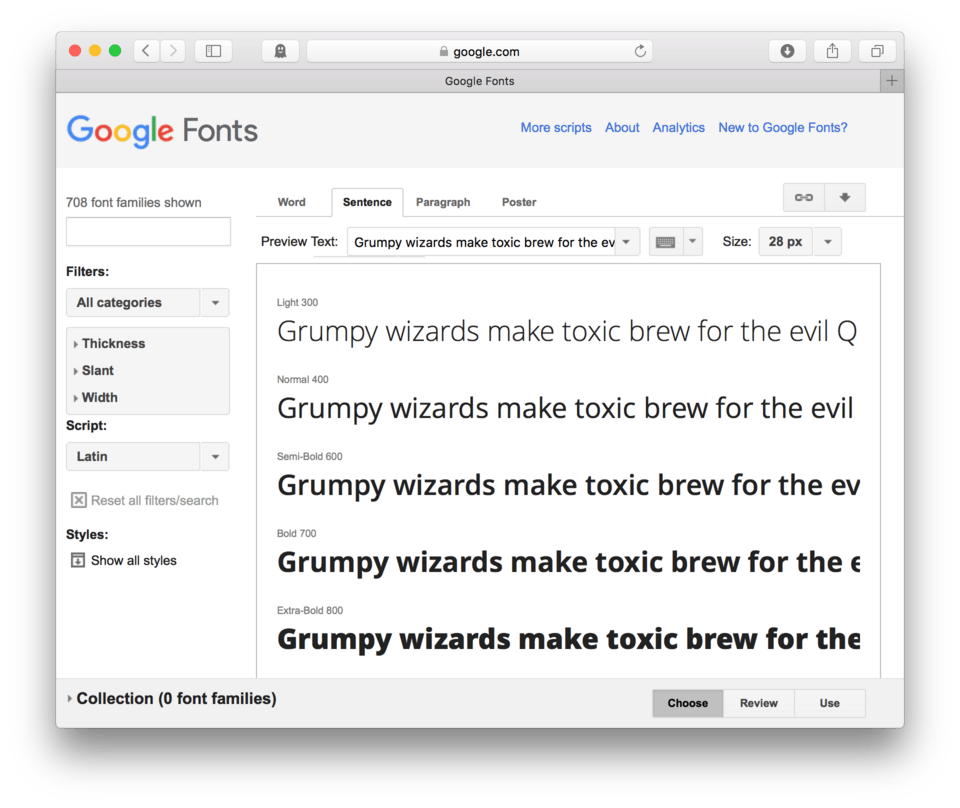
- Click anywhere in the preview box to expand it to see the available styles. (fig. 4)
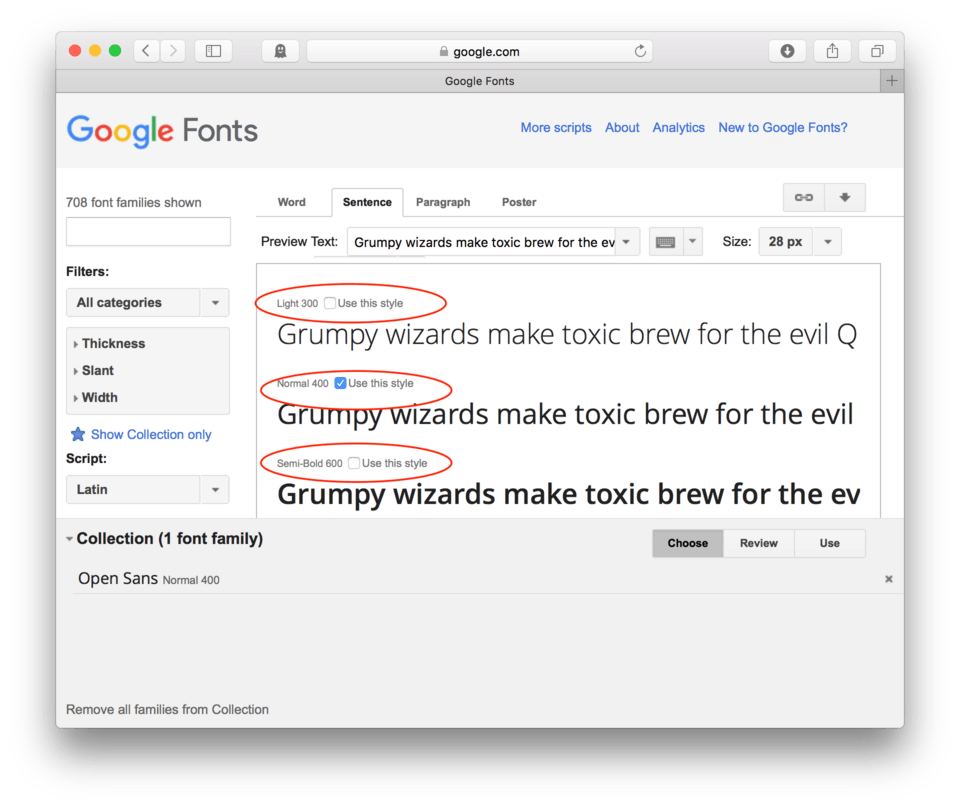
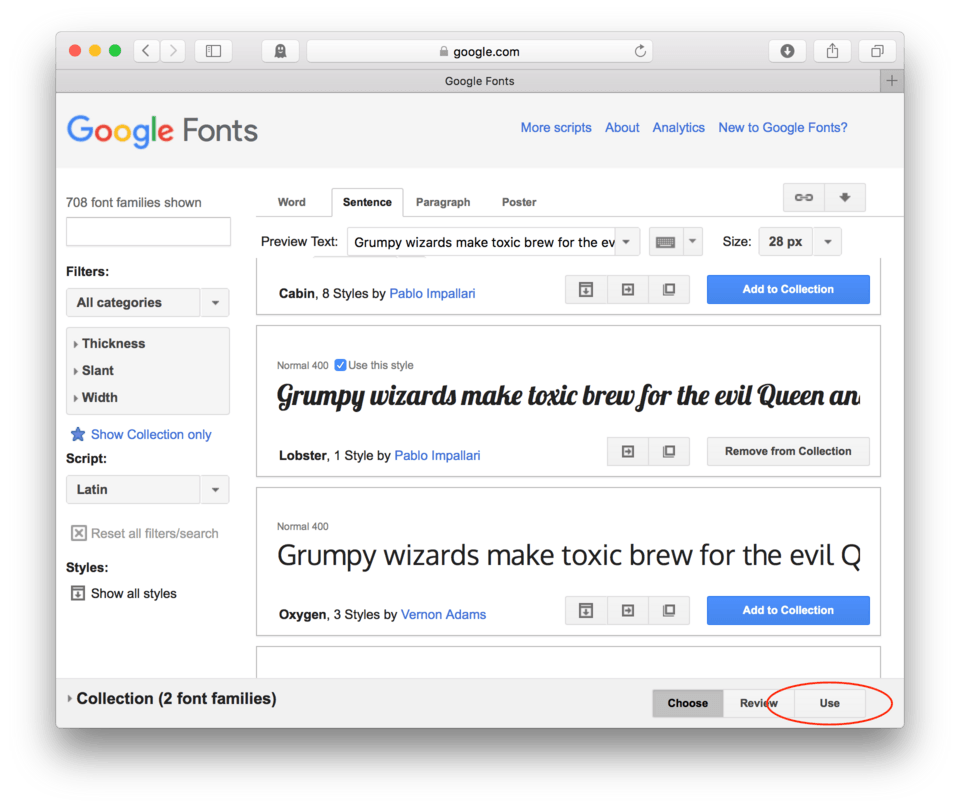
- Scroll a bit if necessary and Click the blue Add to Collection to reveal the tiny checkboxes next to each style of the font (fig. 5)
This is where you get to decide which “fonts” you want in the typeface of Open Sans. For now let’s leave just the default, Normal 400. (fig. 6)
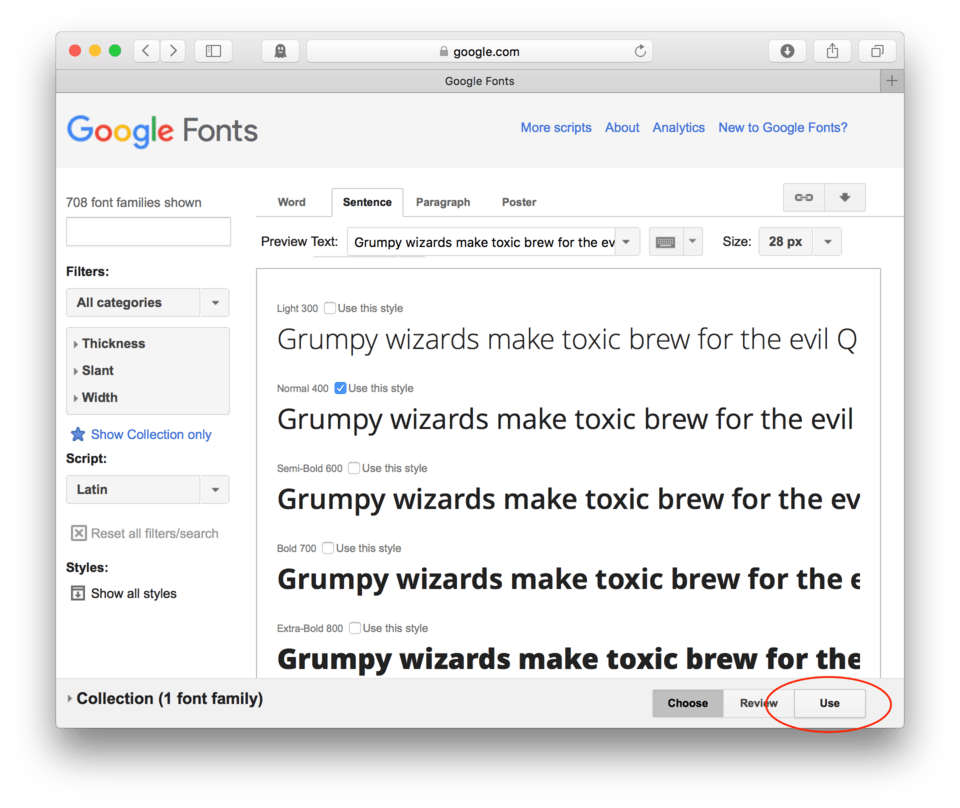
- Click Use from the buttons at the bottom right. (fig. 7)
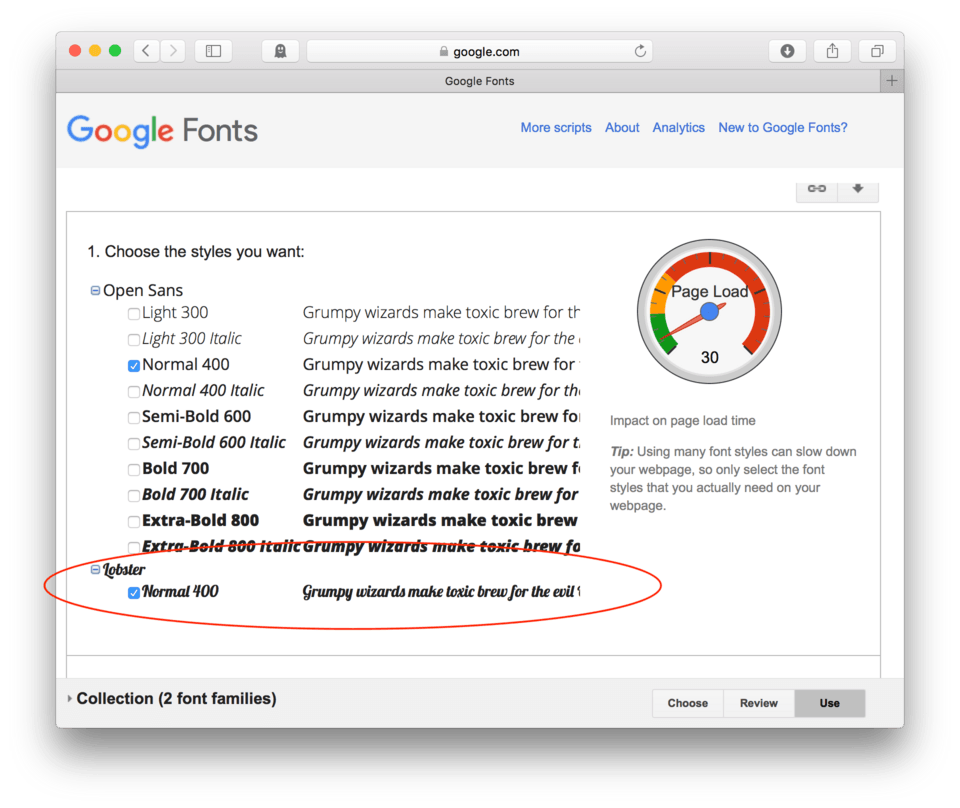
The next screen will give you a second chance to add any other styles you may have overlooked. (fig. 8)
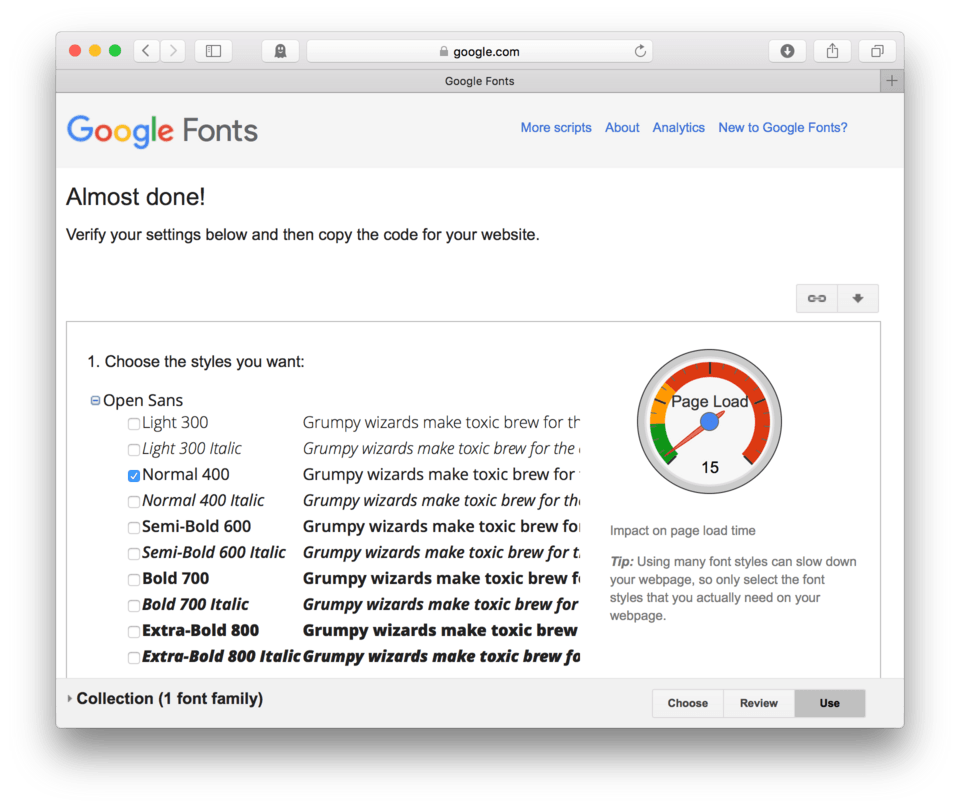
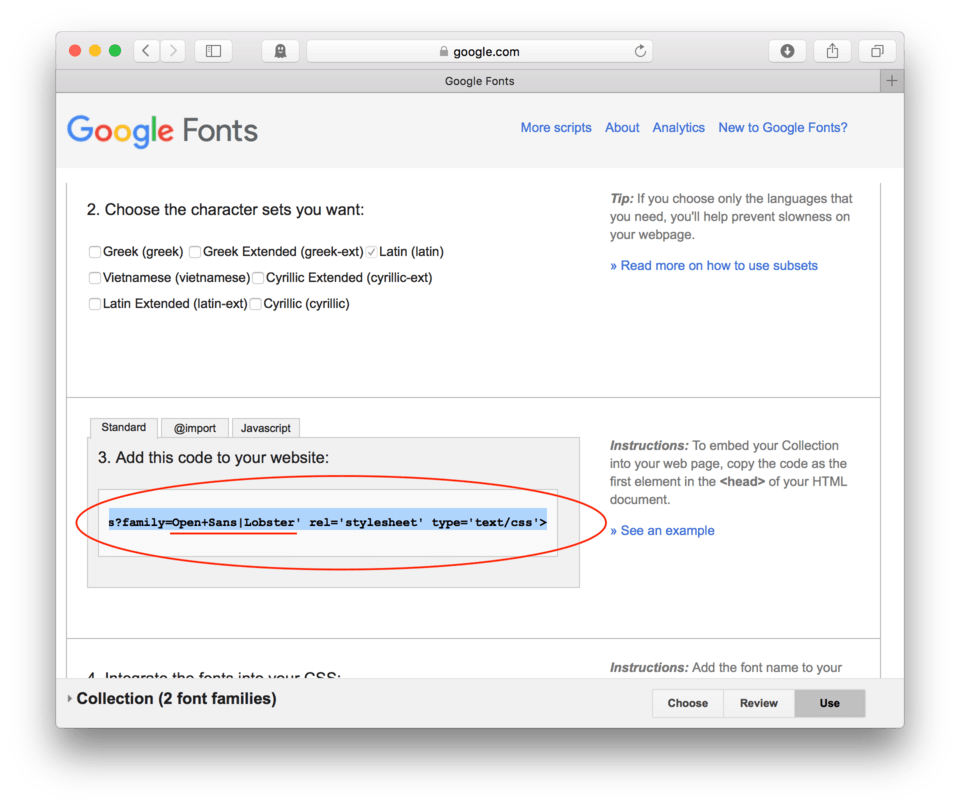
We’ll go ahead and scroll past that for now. Actually we’ll skip down to Step 3. Add this Code to your Website.
Google gives us some pretty good instructions for using this font. First, we’ll need to Copy the code for the stylesheet link from Step 3. (fig. 9)
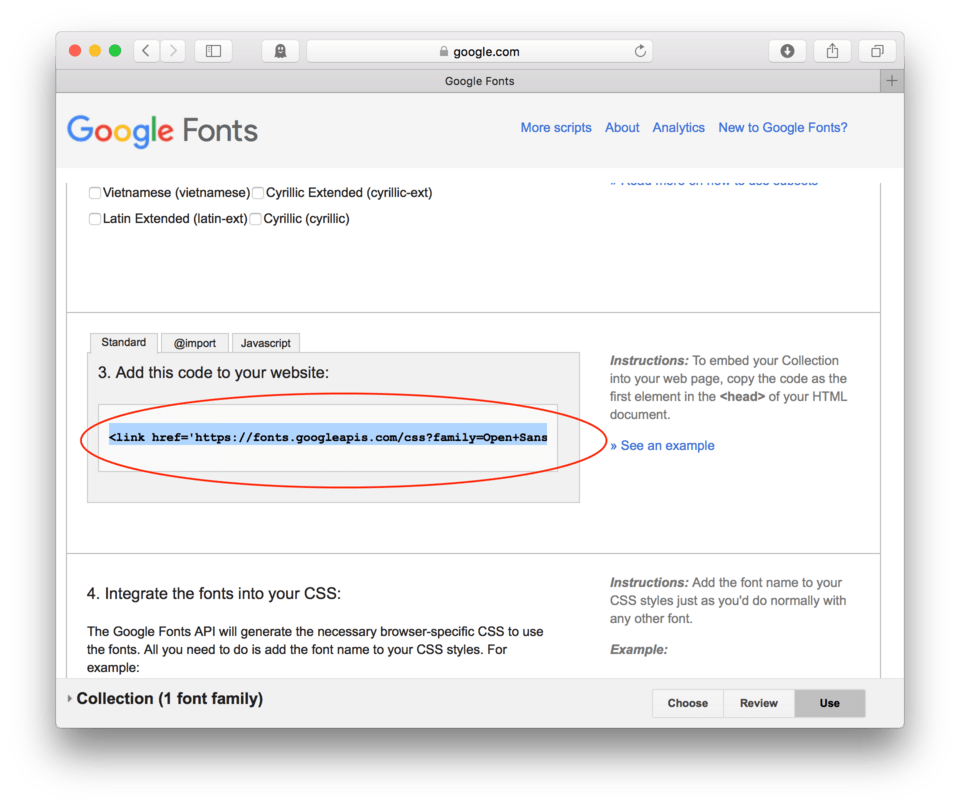
And Paste it into the head section of our HTML file. Notice that we do already have a linked stylesheet, this isn’t a problem. Browsers have the ability to pull from multiple stylesheets.
- Locate your HTML file and Paste the code copied from Google in the line after your original stylesheet.
Here’s how your HTML head section should look:
<head>
	<link href="css/style.css" rel="stylesheet" />
	<link href='https://fonts.googleapis.com/css?family=Open+Sans' rel='stylesheet' type='text/css' />
	<title>Custom Web Fonts</title>
</head>
- Save your HTML file
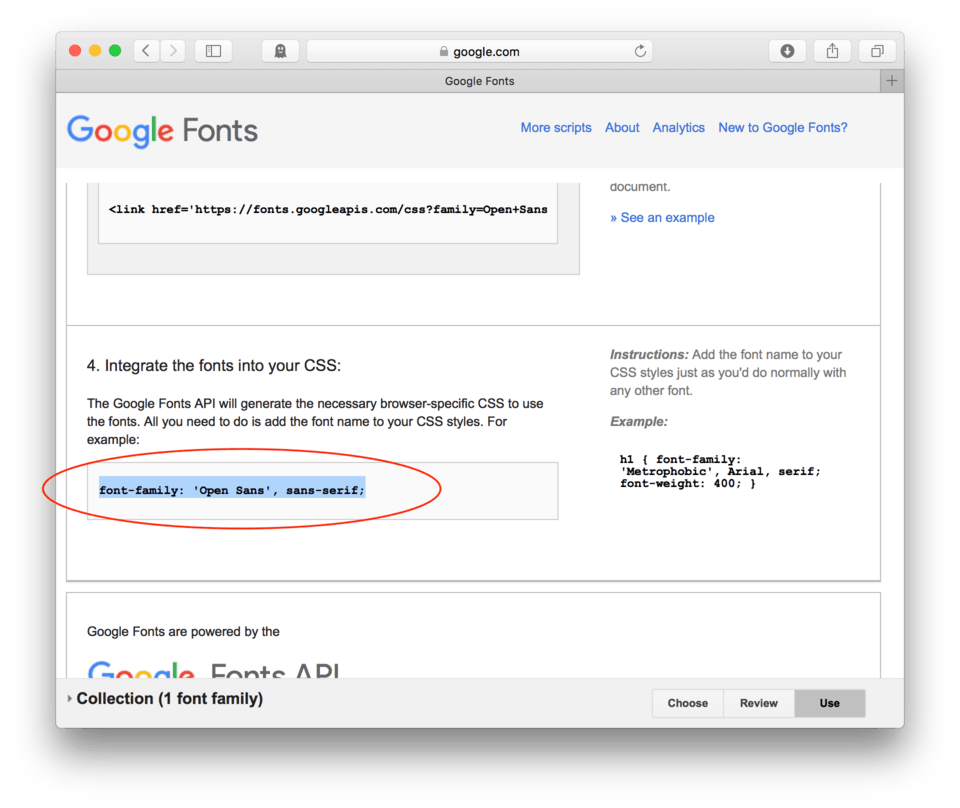
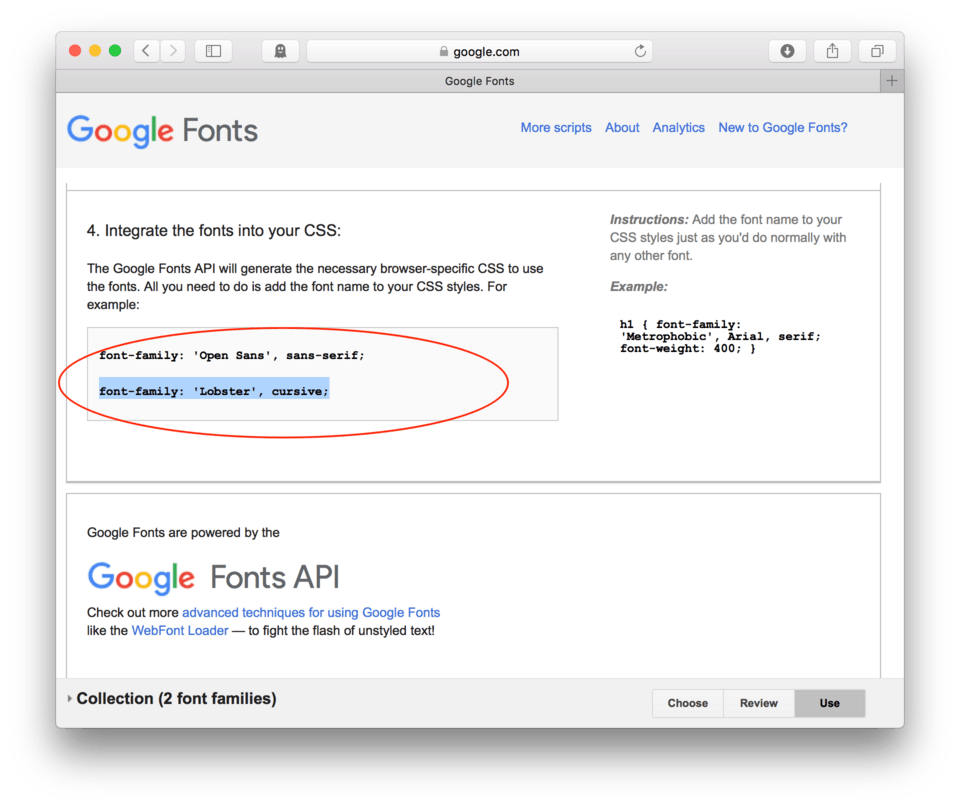
- Return to the Google fonts website for Step 4.
- Copy the code from Step 4
- Locate your CSS file you created earlier in this lesson
- Let’s apply our Open Sans font to our paragraph. Add a CSS block using the selector:
p { - Paste the copied code from Google Fonts:
font-family: 'Open Sans', sans-serif;(fig. 10)
- Save and Refresh
Here’s my CSS:
p {
	font-family: 'Open Sans', sans-serif;
}
and here’s how it looks in the browser. (fig. 11)
You’ll see that my paragraph is now using Open Sans. The font is hosted by Google somewhere in internetland and is being served to my website via a linked stylesheet. Pretty neat, huh?
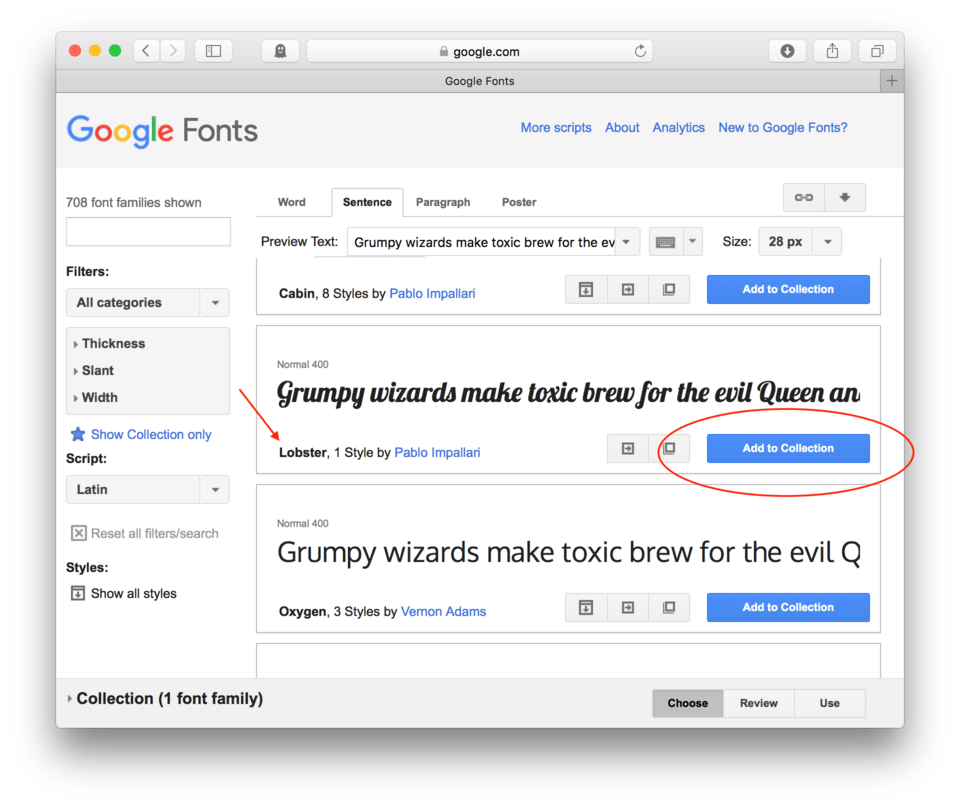
Let’s go get a new font for our h1.
- Back to Google Fonts
- Click the logo in the top left to bring you back to the main page
- Scroll till you find Lobster
- Click Add to Collection (fig. 12)
- Click Use from the bottom right (fig. 13)
You’ll see Lobster got added to the bottom of our list. Since it only has one style, there aren’t any additional style choices for us to make. (fig. 14)
- Scroll to Step 3.
- Copy the code provided. (fig. 15) Notice that this code can be used for both Open Sans and Lobster. We’ll use this line of code to replace our existing link to the Google stylesheet.
- Delete the old Google stylesheet link
- Paste the new code in its place
Here’s how your HTML should look:
<head>
	<link href="css/style.css" rel="stylesheet" />
	<link href='https://fonts.googleapis.com/css?family=Open+Sans|Lobster' rel='stylesheet' type='text/css' />
	<title>Custom Web Fonts</title>
</head>
- Save your HTML file
- Locate your CSS file
- Add a CSS block with the selector
h1 { - Return to the Google Fonts page
- Copy the code just for Lobster from step 4. (fig. 16)
- Paste the code from Step for into the CSS block for your h1
font-family: 'Lobster', cursive; - Close the block
- Save and Refresh
Here’s my CSS:
h1 {
	font-family: 'Lobster', cursive;
}

p {
	font-family: 'Open Sans', sans-serif;
}
Note: I put the h1 CSS block above the paragraph block as it appears first in my HTML file.
and here’s how it looks in the browser. (fig. 17)
If things worked correctly, our h1 is now typeset in Lobster. We have two custom webfonts coming from a hosted site. Anyone who visits our site would be able to see these fonts. We could apply these fonts to any HTML element using the same font-family: properties with the same values we’ve used already.
Using Font Squirrel (Self-Hosted)
Okay, now that we’ve covered an example of hosted webfonts, I’d like to walk you though using the self-hosted variety. These are a bit more complicated, but worth knowing about. For our example we’ll use a web service called Font Squirrel since it provides downloads for 100% Free For Commercial Use fonts.
First off, we’ll add a bit more content to our page to style.
- Locate your HTML file
- Add
<h2>Self-Hosted</h2>to the end of your content - Then, add the following paragraph:
These a bit more complicated, but worth knowing about. For this example we used Font Squirrel since it provides downloads for 100% Free For Commercial Use fonts.
- Save and Refresh
Here’s how your HTML should look:
<h2>Self-Hosted</h2>
<p>These a bit more complicated, but worth knowing about. For this example we used <a href="http://www.fontsquirrel.com">Font Squirrel</a> since it provides downloads for 100% Free For Commercial Use fonts.</p>
and here’s how it looks in the browser. (fig. 18)
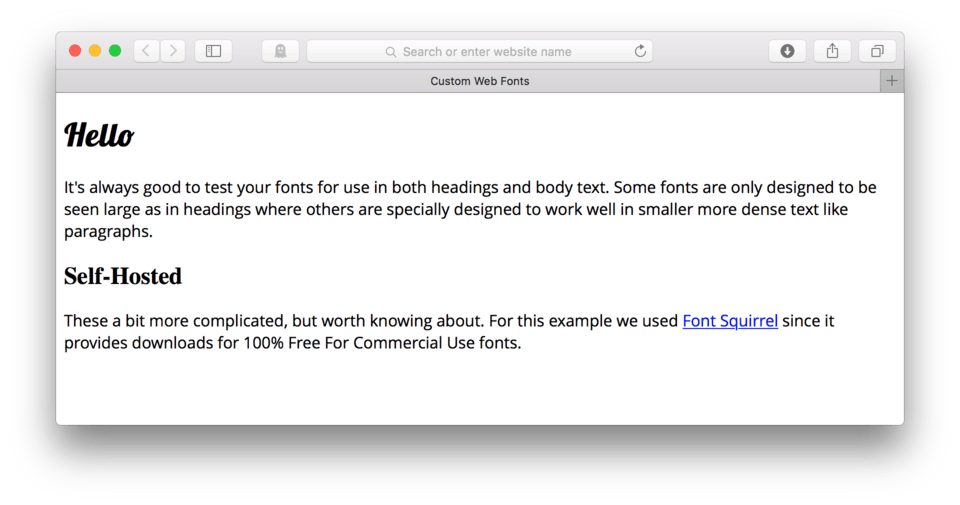
You’ll notice that our new paragraph is typeset in Open Sans. This makes sense because our CSS block is using p { as the selector meaning all paragraphs, so any new paragraph will use Open Sans unless we find a way to use specificity to single one out.
Next, we’ll need to find a suitable web font to apply using CSS. We’ll be using Font Squirrel.
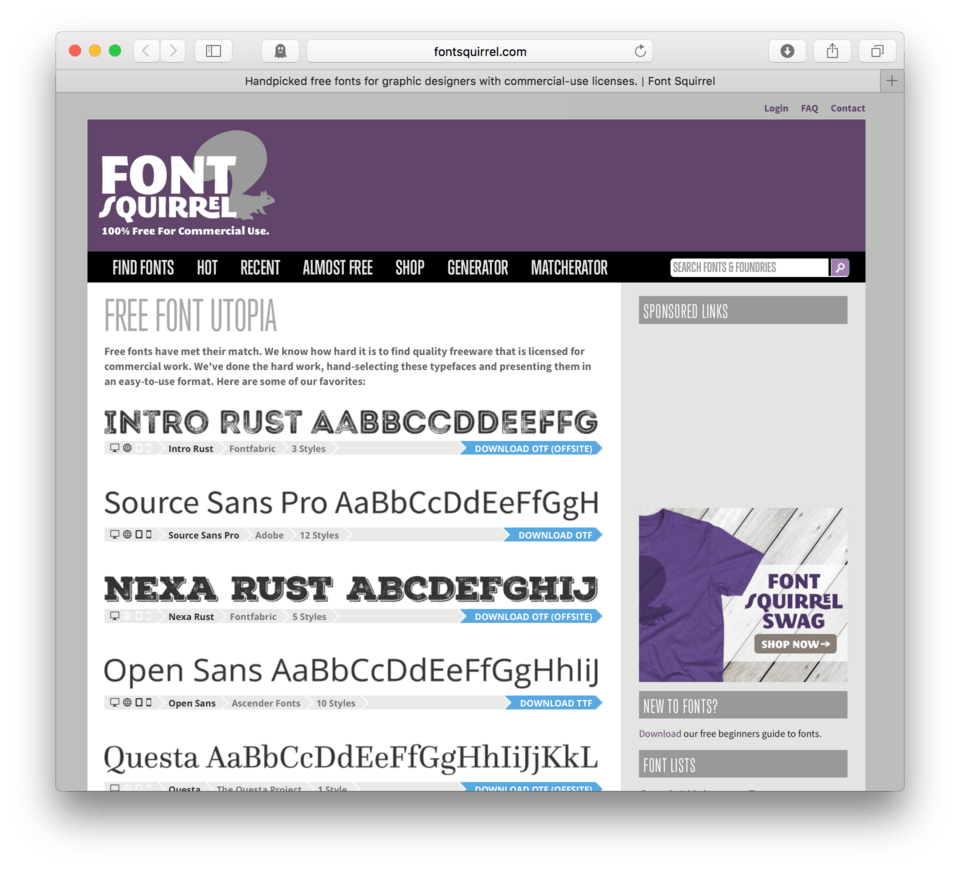
- Navigate to Font Squirrel.
Here’s what you should be seeing. (fig. 19)
If you scroll the page, you’ll see tons of fonts to choose from. Each typeface is displayed with a preview, in the bottom left you can see the name, the number of styles available, and the contributor. (fig. 20)
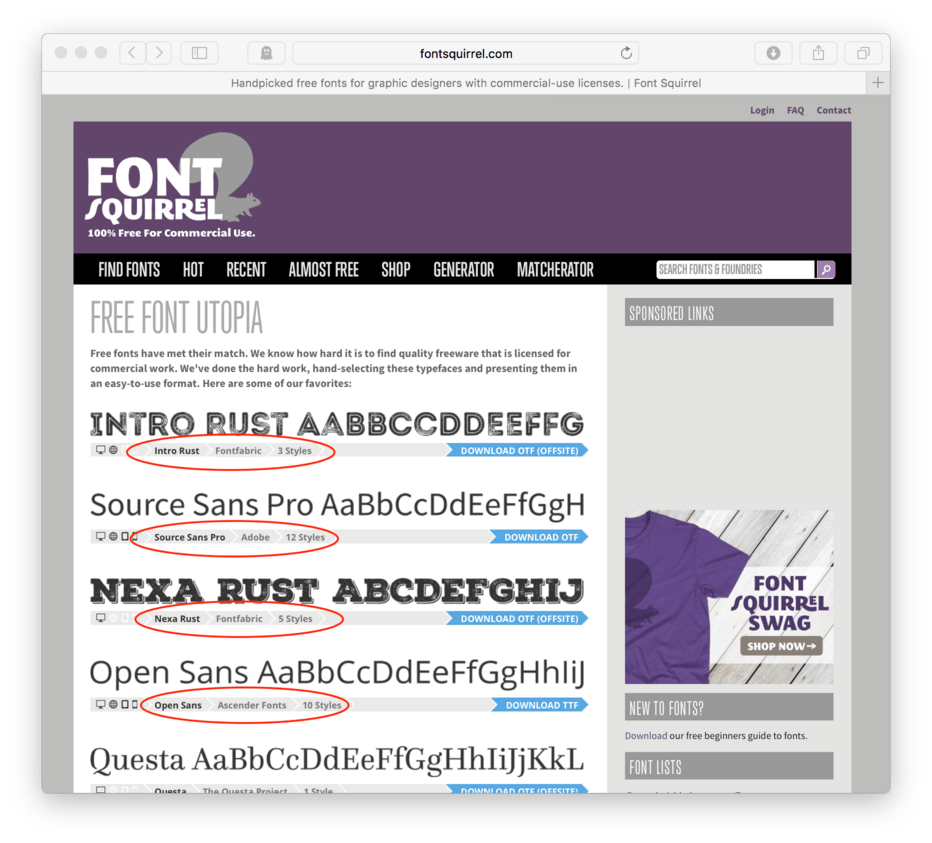
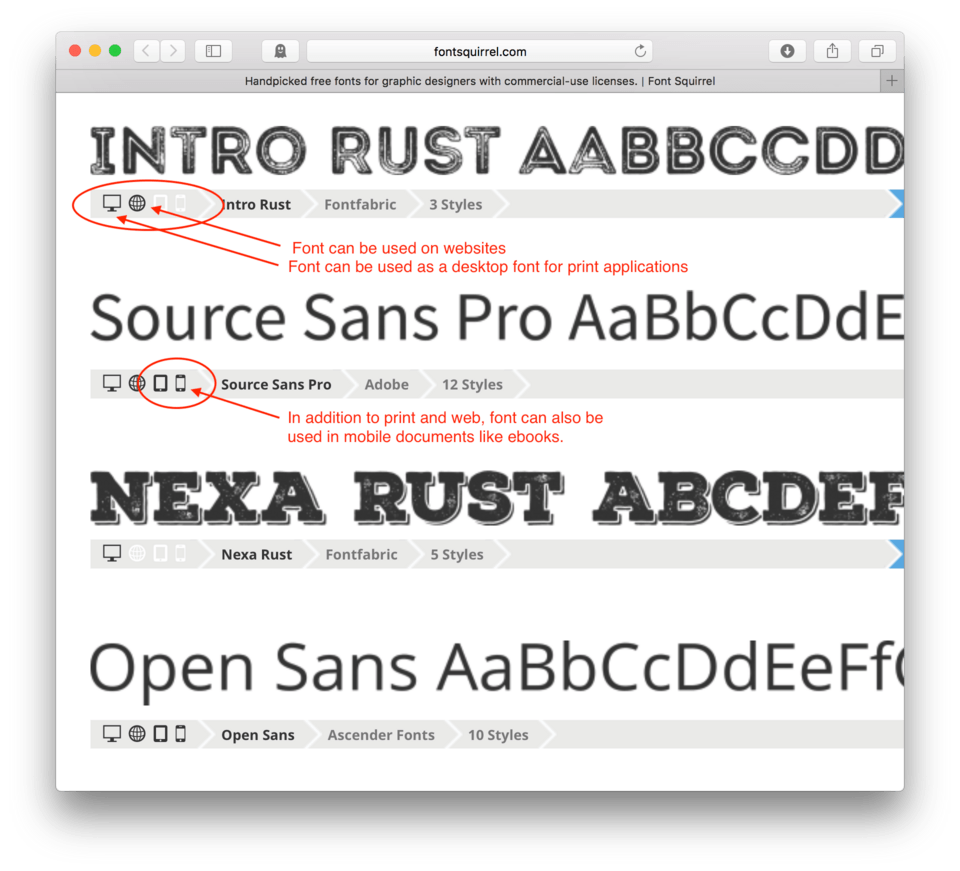
Also on the bottom leftmost corner you’ll see some icons representing what type of font downloads are available. Font Squirrel doesn’t just deal in web fonts, they also provide 100% Commercial Free desktop fonts as well.
We need to make sure that when we choose a font to use on a website, that we choose one that has a web font icon, the small globe, otherwise we could still use that font in print applications but not as a font for use on a web site. Some will have tablet and phone icons as well, this indicates that the font can also be used in mobile documents like ebooks. (fig. 21)
It’s also best to choose one that is available through Font Squirrel and not as an offsite download. To sort our choices based on this we can use a filter. You’ll probably have to scroll a bit, but on the right sidebar you’ll eventually see a section called “Font Filter”.
There should be a subheading titled “Downloads”. We’ll want to choose: Local Only. (fig. 22)
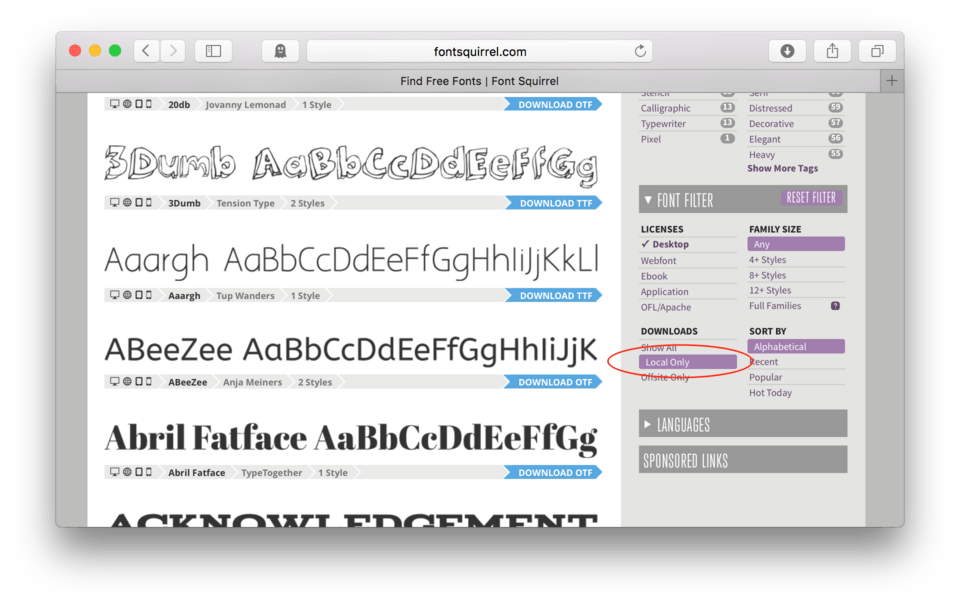
This should limit our choices to just those available for download on this site. Others may be available as offsite downloads, but each will have its own unique instructions. For this lesson, it makes the most sense to have everyone on the same page.
- Let’s choose AIRSTREAM, you may have to scroll just a bit to find it.
- Click anywhere in the preview box to be taken to the specimen page to see the available styles. (fig. 23)
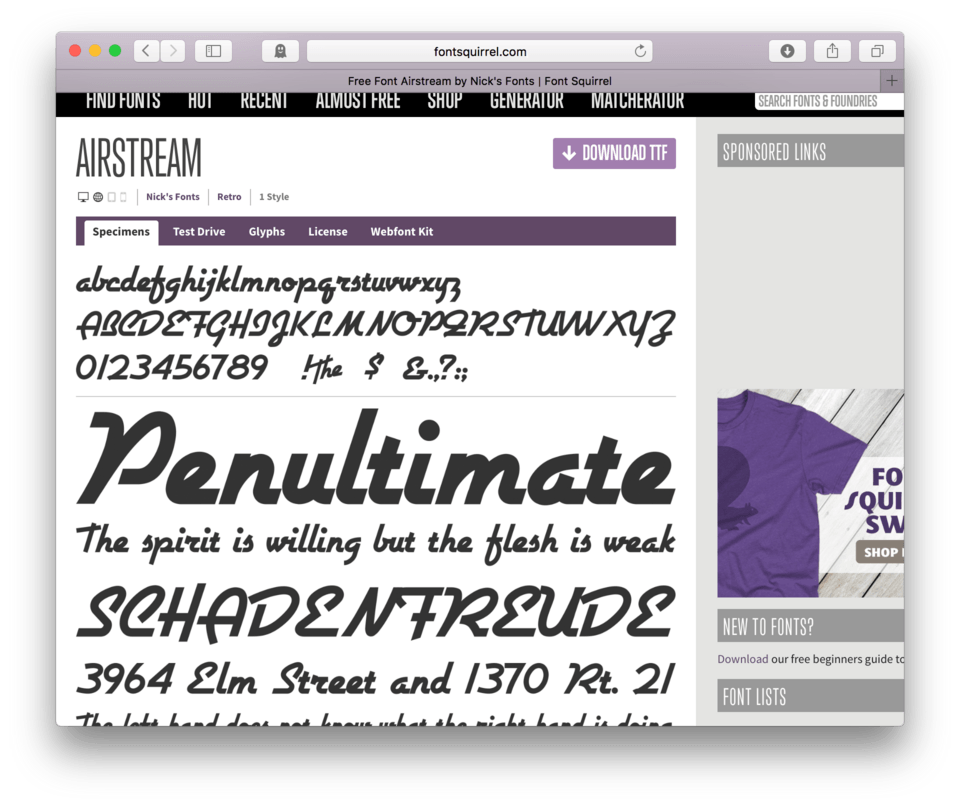
The various tabs let you explore the font a bit more. You can test drive it with your own text, see any styles available, but most importantly, you can download the Webfont Kit.
- Click Webfont Kit to expose the download options (fig. 24)
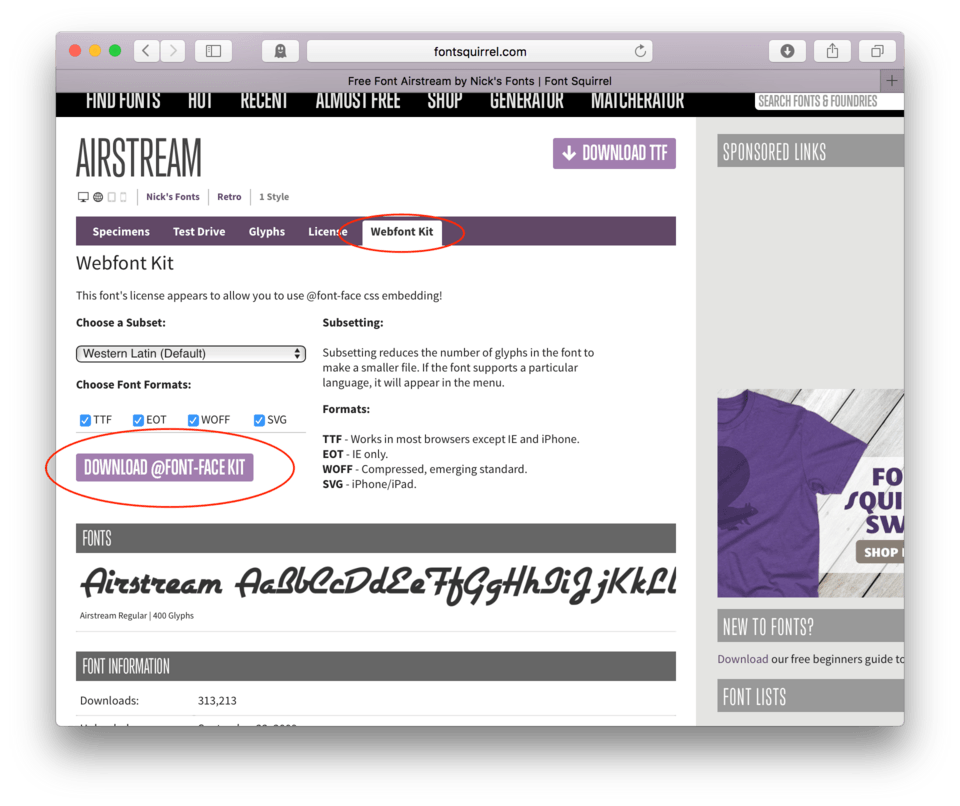
We’ll make sure the 4 different file types are checked and then hit the Download @Font-Face Kit button
Note: Now and then you might get an error message of sorts rather than the web-font kit when you click the web-font kit tab. It will say something to the effect of “the font license doesn’t allow this or that and you can generate the fonts on your own”. When this happens, I’d recommend just choosing a font that has the kit generated for you. It will save you a lot of headaches. Remember its a free service and with it comes some consequences. One of these is limited choices and a few stumbling blocks.
Okay, so clicking that button should have forced a download to your computer.
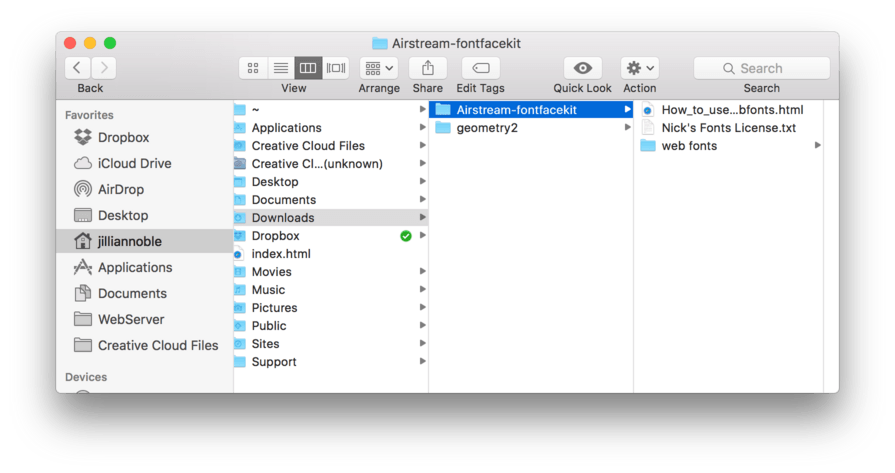
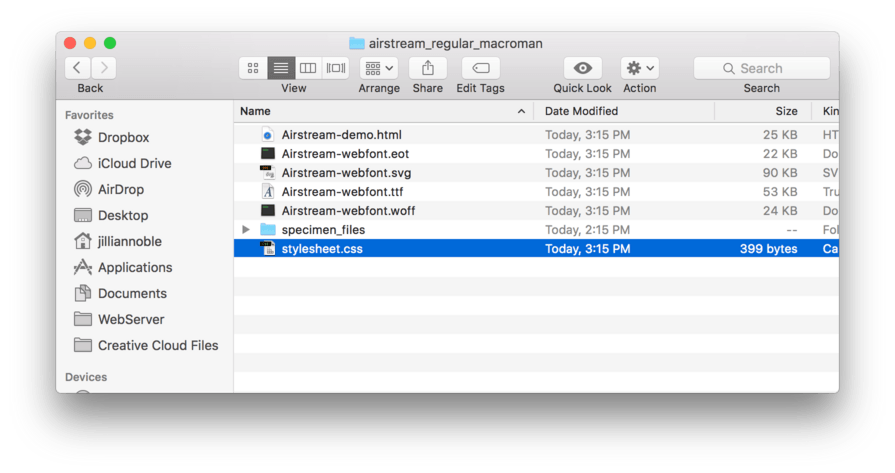
- Locate the Airstrem-fontfacekit folder that just downloaded. If you’re on a Mac it should be in your downloads folder.
- Open the folder. Inside should be three things including a folder named web fonts. (fig. 25)
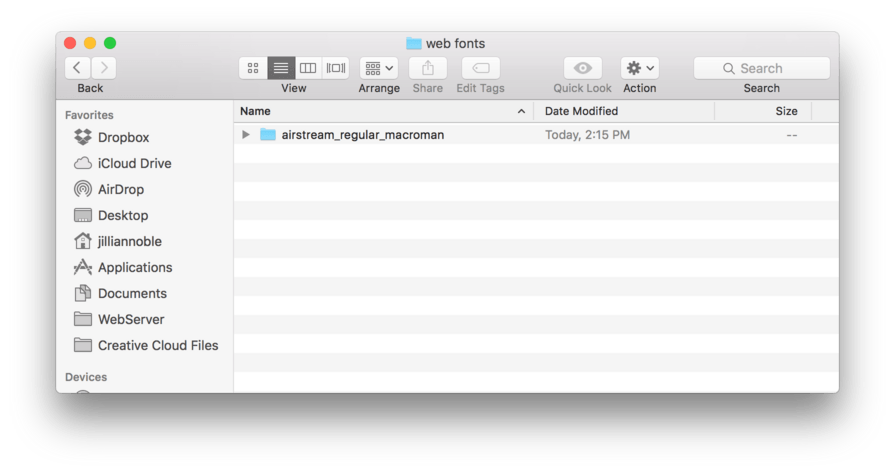
- Open the web fonts folder to reveal another folder. (fig. 26)
- Open that folder to reveal the font files we need for our site. There are 4 that we’ll be using: .eot, .svg, .ttf, and .woff. The reason we have so many is that different browsers require different file formats. (fig. 27)
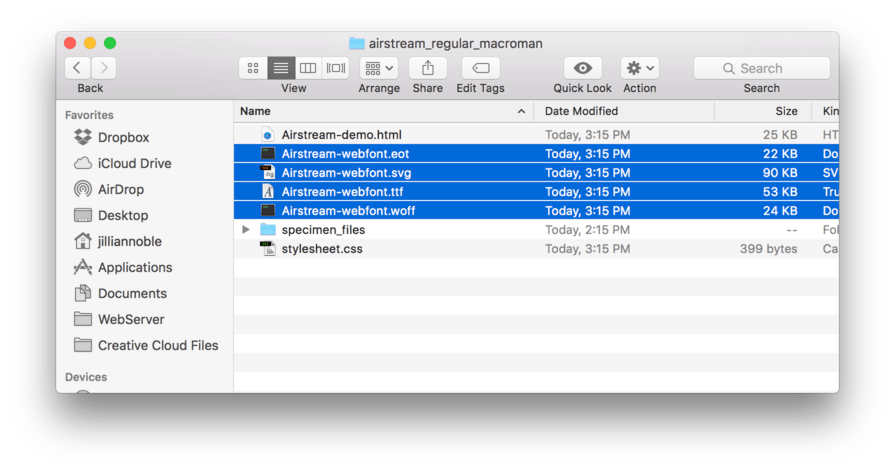
- Inside of our Lesson10 root folder, create a subfolder named fonts.
- Move those four font files into the fonts subfolder we just created. (fig. 28)
Now we need to use CSS to call these files. Our @Font-Face kit provided us with a basic structure to use. We’ll need to go back to that original download folder.
- Return to TextMate
- File > Open
- Navigate to the Airstrem-fontfacekit folder that just downloaded.
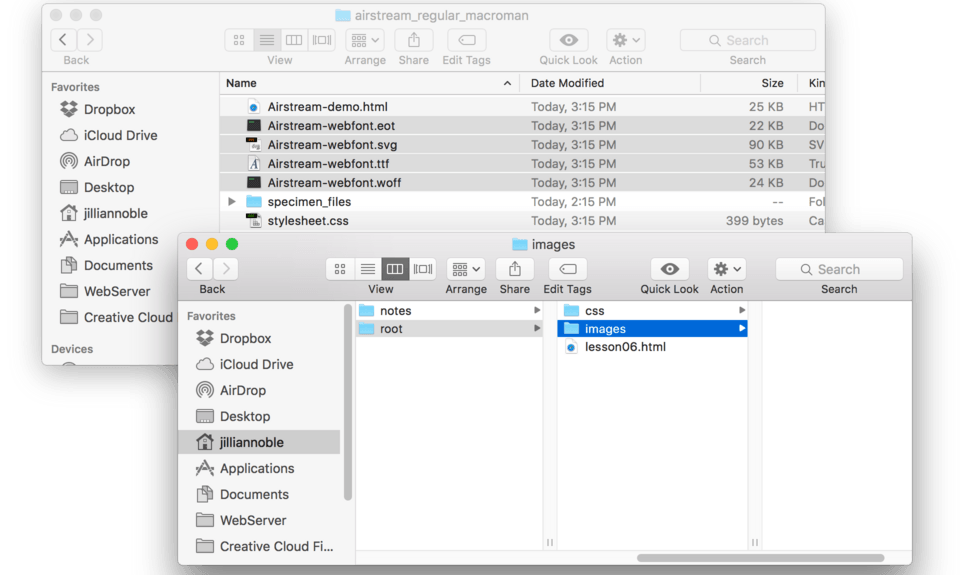
- Open web fonts folder
- Open the following folder to reveal the stylesheet.css file inside (fig. 29)
- Click Open. TextMate should open a new file with some CSS code.
Here’s what it should look like:
@font-face {
  font-family: 'airstreamregular';
  src: url('Airstream-webfont.eot');
  src: url('Airstream-webfont.eot?#iefix') format('embedded-opentype'),
       url('Airstream-webfont.woff') format('woff'),
       url('Airstream-webfont.ttf') format('truetype'),
       url('Airstream-webfont.svg#airstreamregular') format('svg');
  font-weight: normal;
  font-style: normal;
}
It looks a little overwhelming, I know. But let’s dissect it a bit to see what we’ve got.
The first bit:
@font-face {
This crazy selector can actually pull fonts from the font folder so other CSS can access it. Alone this block of CSS doesn’t change anything we can see. It just allows us to use the fonts in our fonts folder.
The next bit:
font-family: 'airstreamregular';
This should be familiar. The font-family: property is used to tell the browser which font you want to display. Using it under the @font-face { selector is actually naming the font that we are pulling from our fonts folder so we can use it later in our code. We could use any name for it really, but its best to use the name that comes pre-packaged as it is good and descriptive.
The next chunk:
src: url('Airstream-webfont.eot');
src: url('Airstream-webfont.eot?#iefix') format('embedded-opentype'),
     url('Airstream-webfont.woff') format('woff'),
     url('Airstream-webfont.ttf') format('truetype'),
     url('Airstream-webfont.svg#airstreamregular') format('svg');
This chunk takes up the most space and looks the scariest. This chunk is providing the address for each of the 4 font files we put in our fonts folder. You can see the src: attribute here. It’s similar to the src= attribute we use in HTML only in CSS we use a : rather than an =.
You’ll also see that it lists the address as url(. This is just part of the CSS syntax needed to tell an address. We really only need to concern ourselves with what happens in between the parenthesis.
Right now we only see the filename inside. This essentially is telling the browser that our font files are next door neighbors with the CSS file that it is reading from. This isn’t true in our case though, right? Our fonts aren’t living side by side with out stylesheet, instead they are living in their own folder named fonts that actually up one folder and inside another. In the next step will work more on this.
The next bit:
font-weight: normal;
This is a pretty easy one. This property simply sets the weight of the font to the default mode. For most fonts this is the “regular” style.
The next bit:
font-style: normal;
Another fairly straightforward line of CSS. This declaration makes sure that our webfont is its default style. Other options might be “italic” or “bold” for example.
The very last bit:
}
This curly bracket just closes the CSS block like any other CSS block.
To use this CSS, we’ll need to move it from this stylesheet to our own.
- Select the entire block of CSS (fig. 30)

- Edit > Copy to copy the block
- Locate your CSS file, style.css
- We want this to be the very first CSS block in our file. So right after the boilerplate, hit Enter to make room
- Edit > Paste to paste the block in
Here’s how your CSS should look:
@font-face {
  font-family: 'airstreamregular';
  src: url('Airstream-webfont.eot');
  src: url('Airstream-webfont.eot?#iefix') format('embedded-opentype'),
       url('Airstream-webfont.woff') format('woff'),
       url('Airstream-webfont.ttf') format('truetype'),
       url('Airstream-webfont.svg#airstreamregular') format('svg');
  font-weight: normal;
  font-style: normal;
}

h1 {
	font-family: 'Lobster', cursive;
}

p {
	font-family: 'Open Sans', sans-serif;
}
Setting the Correct Font Address
As we mentioned briefly above, the address that is currently listed in between the parenthesis isn’t correct. It is assuming that our font files are in the same folder as our CSS which isn’t true in our case. They actually live in a folder of their own outside of our CSS folder.
This is a more complicated address than we’ve dealt with before, but it’s really not that bad. We just need to take a look at our folder structure and describe each step. (fig. 31)
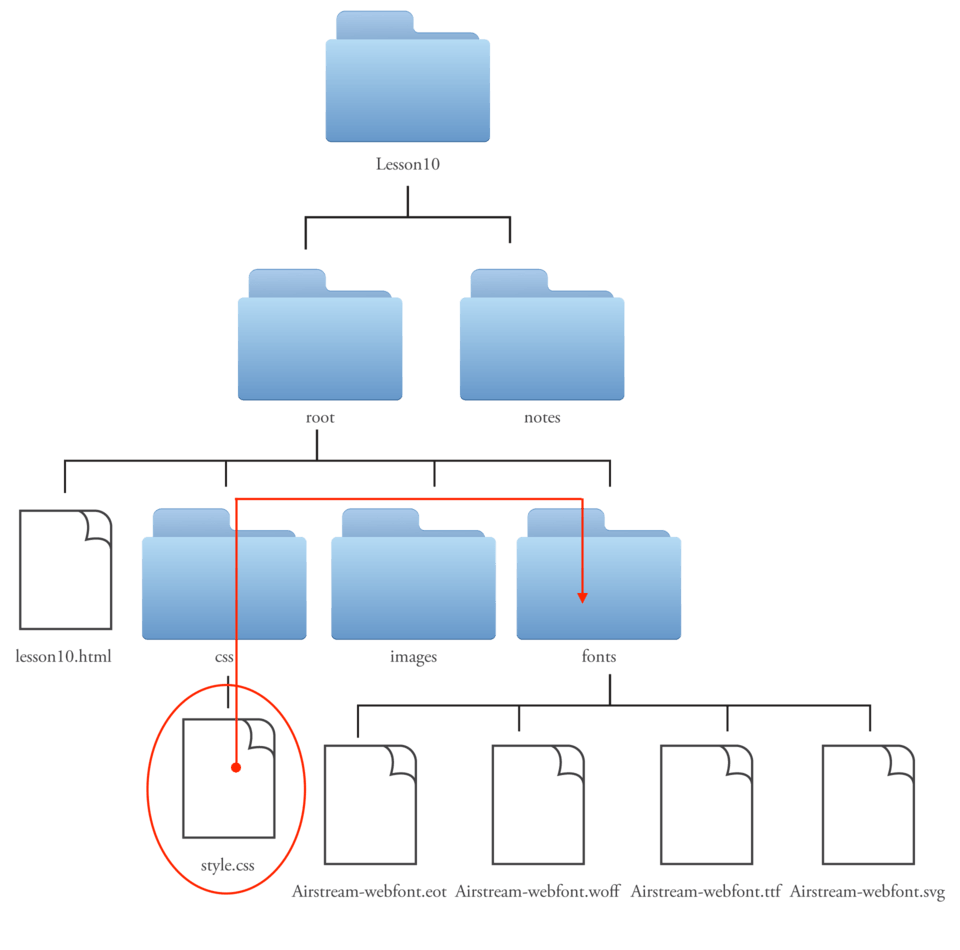
We need to start with the place where the browser is currently reading the code from which is the stylesheet, style.css living inside the CSS folder.
The first thing we need to say in the address is: “Move up and out of this folder, or in computer terms, move up one directory”. To do this in code, we type: ../ (period period forward slash). That tells the browser to move up a folder.
Next, we need to tell the browser to find the folder called fonts and look in there. We simply type: fonts/ to say that.
Now, we need to call the file by name. Lucky for us, the Webfont Kit did this for us so for each of the five files we just need to add: ../fonts/ to the beginning of each of those file names. Make sure to do this after the opening single quotation mark.
Your @font-face CSS should now look like this:
@font-face {
  font-family: 'airstreamregular';
  src: url('../fonts/Airstream-webfont.eot');
  src: url('../fonts/Airstream-webfont.eot?#iefix') format('embedded-opentype'),
       url('../fonts/Airstream-webfont.woff') format('woff'),
       url('../fonts/Airstream-webfont.ttf') format('truetype'),
       url('../fonts/Airstream-webfont.svg#airstreamregular') format('svg');
  font-weight: normal;
  font-style: normal;
}
Now that our addresses are correct we can now finally apply our font to our h2.
- At the end of your CSS file, add
h2 { - Now, we can simply use the property from our @font-face line:
font-family: 'airstreamregular';. You can simply copy and paste it from above if you like. - Close the CSS block, type:
}
Your h2 CSS should now look like this:
h2 {
	font-family: 'airstreamregular';
}
Your entire CSS file should look like this:
@font-face {
  font-family: 'airstreamregular';
  src: url('../fonts/Airstream-webfont.eot');
  src: url('../fonts/Airstream-webfont.eot?#iefix') format('embedded-opentype'),
       url('../fonts/Airstream-webfont.woff') format('woff'),
       url('../fonts/Airstream-webfont.ttf') format('truetype'),
       url('../fonts/Airstream-webfont.svg#airstreamregular') format('svg');
  font-weight: normal;
  font-style: normal;
}

h1 {
	font-family: 'Lobster', cursive;
}

p {
	font-family: 'Open Sans', sans-serif;
}

h2 {
	font-family: 'airstreamregular';
}
Finally.
- Save and Refresh
and here’s how it looks in the browser. (fig. 32)
It took some doing, but we now have our h2 typeset in Airstream. Now that we have the @font-face setup for Airstream, we can use it in any CSS block we choose by using the property: font-family: 'airstreamregular';.
Okay, so I hope by now you are beginning to see the extra effort that goes into using a self-hosted font. We had to locate a source for our font, download a generated package of web-friendly font files, nest them inside a fonts folder inside our root folder, link them to our site using a @font-face {, and ensure that the address correctly pointed to the files. Then we were finally able to simply call them using the property: font-family:.
Using Additional Self-Hosted Fonts
You can use as many self-hosted fonts as you care to download. Follow the exact same steps for each one. It’s totally find to put all font files in the same “fonts” folder.
There is one BIG caveat though. You need to have a totally separate @font-face block for each one. So if you are using three self-hosted fonts, you’ll have three separate @font-face { code blocks. Each will need to have the correct address to the fonts folder and each will have to be closed with a }. Don’t be concerned that all three are using the same selector, this is just how it happens to work.
Here’s an example of how it would look if I were using three self-hosted fonts:
@font-face {
  font-family: 'airstreamregular';
  src: url('../fonts/Airstream-webfont.eot');
  src: url('../fonts/Airstream-webfont.eot?#iefix') format('embedded-opentype'),
       url('../fonts/Airstream-webfont.woff') format('woff'),
       url('../fonts/Airstream-webfont.ttf') format('truetype'),
       url('../fonts/Airstream-webfont.svg#airstreamregular') format('svg');
  font-weight: normal;
  font-style: normal;
}

@font-face {
  font-family: '2dumbregular';
  src: url('../fonts/2Dumb-webfont.eot');
  src: url('../fonts/2Dumb-webfont.eot?#iefix') format('embedded-opentype'),
       url('../fonts/2Dumb-webfont.woff') format('woff'),
       url('../fonts/2Dumb-webfont.ttf') format('truetype'),
       url('../fonts/2Dumb-webfont.svg#2dumbregular') format('svg');
  font-weight: normal;
  font-style: normal;
}

@font-face {
  font-family: '1942_report1942_report';
  src: url('../fonts/1942-webfont.eot');
  src: url('../fonts/1942-webfont.eot?#iefix') format('embedded-opentype'),
       url('../fonts/1942-webfont.woff') format('woff'),
       url('../fonts/1942-webfont.ttf') format('truetype'),
       url('../fonts/1942-webfont.svg#1942_report1942_report') format('svg');
  font-weight: normal;
  font-style: normal;
}

h1 {
	font-family: 'Lobster', cursive;
}

p {
	font-family: 'Open Sans', sans-serif;
}

h2 {
	font-family: 'airstreamregular';
}

h3 {
	font-family: '1942_report1942_report';
}

h4 {
	font-family: '2dumbregular';
}
It’s really important that you make sure each @font-face is an independent code block and that the addresses are correct. Also, make absolutely sure you didn’t forget to copy the font files into your fonts folder. If you don’t do this, the fonts simply won’t work and the browser will just use the default fallback.
Lesson Conclusion
You are now able to use custom fonts on your site. We talked about the various options for finding and using custom fonts. We learned the primary differences between hosted fonts like Google Fonts and self-hosted fonts like those available through Font Squirrel.There are both paid and free models for both hosted and self hosted, each with their own pros and cons.
We also spent a great deal of this lesson talking about copyright as it applies to using and distributing fonts. Be really careful about this. It is your responsibility to ensure that you are not violating copyright and neither are your users.
Next up, we will talk about how to some basic positioning of our content.